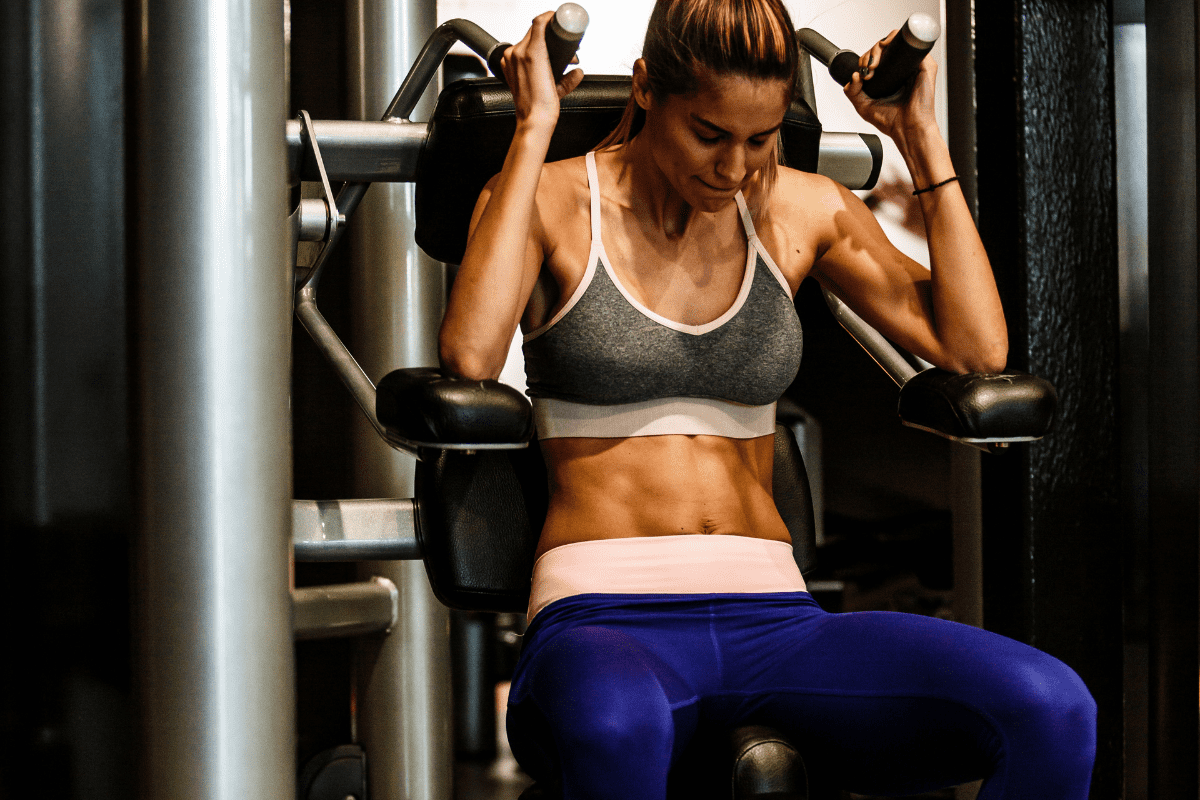
14 Ab Machine Crunch Alternatives To Challenge Your Core
If you’re looking to mix up your core routine and try some new exercises, you’re in the right place. Ab Machine Crunches are a popular exercise for strengthening the abs, but they’re not the only option.
Let’s be honest, if you’re working out at home, chances are you don’t have an ab machine sitting in your garage (kudos to you if you do!).
So, in this article, I’ll introduce you to some alternative exercises that can help you target your abs and improve your core strength. Whether you’re a beginner or an experienced lifter, these alternatives will provide you with new ideas to work your abs and improve your overall core strength.
Alternatives to Ab Machine Crunches
These Cable Crunch alternatives have a lot of variety within them. Some still require equipment – medicine balls, weight plates, stability ball – but many exercises don’t require any equipment at all.
My goal with this list was to give you a bunch of ideas so you could pick and choose which exercises you like the best to serve as a replacement for Ab Machine Crunches.
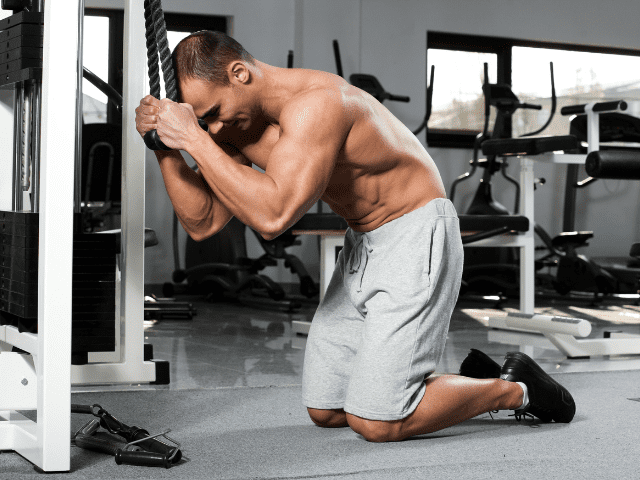
Cable Crunches
Equipment Needed
- Cable Machine
Muscles Worked
- Abdominal Core Muscles (Rectus Abdominus, Obliques Externus Abdominus, Pyramidalis)
Step-by-Step Instructions
- Set up a cable machine at a height where the attachment can reach close to the floor.
- Grab the attachment*, pull it to the back of the shoulders (similar to a back squat) and sit down on your knees.
- Start with the torso completely upright.
- Then, crunch down, taking your shoulders down towards your thighs.
- Slowly return back to the starting position and repeat.
Coaching Points
*The two most popular attachment to use for Cable Crunches is the rope and the long straight bar. I would suggest trying both and seeing which you like better.
You don’t need to go super heavy with Cable Crunches. Instead, keep tension on the core throughout the movement and focus on the contraction of each rep. The time under tension over the course of the set will accumulate and you’ll really notice the burn towards the tail end of the set.
Pro Tip: If you don’t have a cable machine, you can do the exact same exercise with a resistance band. Simply loop a resistance band around the top of the squat rack and do the exact same movement with the band.
Weighted Sit-Ups
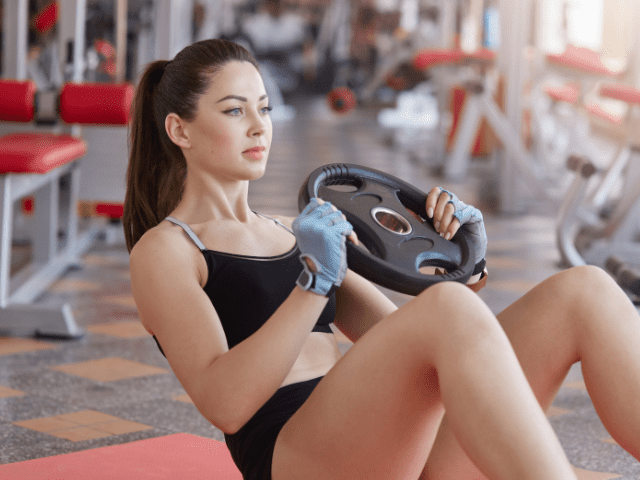
Equipment Needed
- Weight Plate, Dumbbell or Kettlebell
Step-by-Step Instructions
- Grab a plate or dumbbell, lay on your back, knees bent, feet flat on the floor.
- Hold the weight tight against the chest if possible.
- Sit up by contracting and flexing the abdominals
- Lower back down to the floor and repeat
Coaching Points
The biggest mistake I see with Weighted Sit-Ups is holding the weight too low, down towards the stomach. Holding the weight too low takes away much (if not all) of the added resistance that the weight is supposed to be providing.
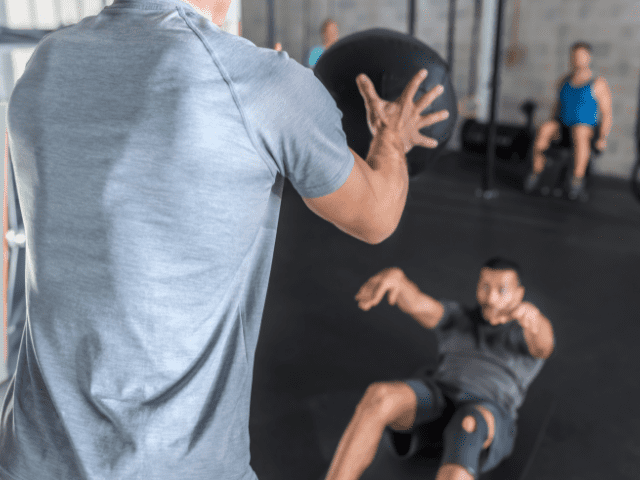
Med Ball Sit-up and Throw
Equipment Needed
- Medicine Ball
- Partner or a sturdy wall to throw the ball against
Step-by-Step Instructions
- Find a partner (or wall) and sit down an appropriate distance away*.
- Lay on your back holding the medicine ball overhead on the ground.
- Brace the core, engage the lats, aggressively begin to raise off the ground and throw the ball as hard as possible for distance.
- The follow-through of the throw should bring you to a full situp position.
- Allow your partner to throw the ball back (or retrieve the ball coming back from the wall) and repeat.
Coaching Points
*The distance away from your partner should be far enough that the ball will hit the ground before reaching your partner so they do not have to catch the ball out of the air. If using a wall, the distance away will be dependent upon the amount of bounce the ball gets off the wall. Find a distance so that you do not need to move between reps.
The biggest mistake I see with athletes trying to learn Sit-up and Throws involves the timing of the movement. The throw should initiate the sit-up, not the other way around. If you try to sit up first, the movement will turn into more of a sit-up followed by a chest pass – not the intention of the movement.
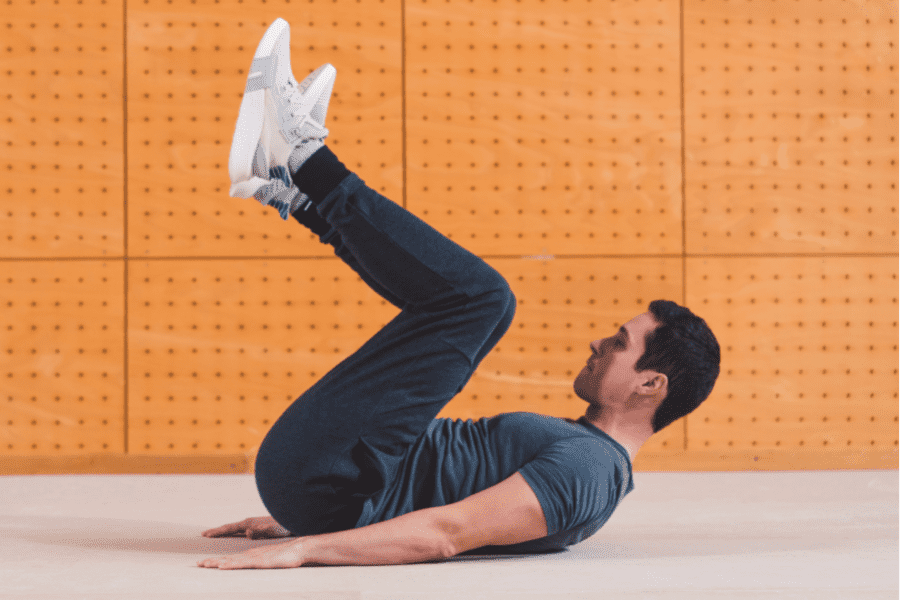
Reverse Crunch
Equipment Needed
- None
Muscles Worked
- Abdominals (Rectus Abdominis, Obliquus Externus Abdominis)
- Hip Flexors (Iliopsoas, Rectus Femoris, Tensor Fasciae Latae)
How To
- Start laying on your back with hands either out to the side or under the low back for support.
- Lift the legs up six inches off the ground.
- Pull the knees in toward the core.
- Now, extend the legs and drive the feet straight up in the air – lifting the hips up off the ground.
- Retrace back to the starting position (keep feet off the ground) and repeat.
Coaching Points
When doing Reverse Crunches, focus on using the core to really lift the hips off the ground and drive the legs into the air at the top. Then, move more slowly and under control back to the start.
Crunches

Equipment Needed
- None
How To
- Lay flat on your back with your knees bent to 90 degrees, feet off the ground
- Place your hands behind to head and keep your chin off you chest throughout the entire movement
- Lift your shoulder blades off of the ground approximately 3 to 5 inches
- Slowly return to the starting position and immediately repeat the exercise until all reps are completed
Coaching Points
Do not pull on the back of the head when doing Crunches. The hands behind your head should only be there to support the head, not pull on it. Keeping your chin up and away from your chest will help in preventing this.
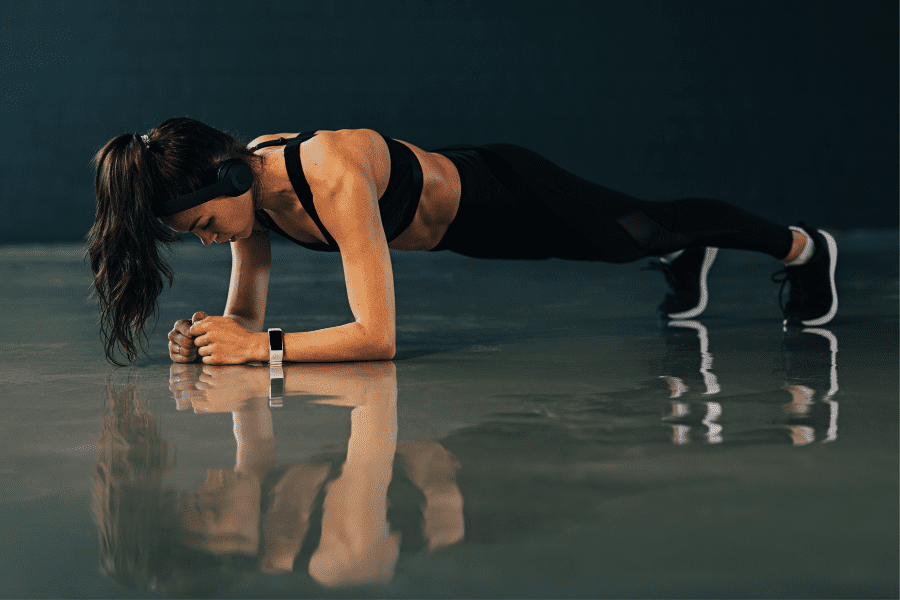
Front Plank
Equipment Needed
- None
Step-by-Step Instructions
- Start on the ground on your stomach.
- Assume a push-up like position on your elbows and toes. Elbows should be directly under the shoulders.
- Position your body in a straight line from the shoulders through the hips, knees and ankles.
- Brace the core tight. (As if you’re going to be punched in the stomach)
- Do not let the body slouch to the ground nor push the hips up high in the air.
- Hold for the designated amount of time.
Coaching Points
The biggest mistake that I see with Front Planks is athletes holding the position, but not properly keeping the core engaged and just allowing the torso to slouch. So, while they are technically up on their elbows and toes, all they’re really doing is straining the low back.
Medicine Ball Slams

Equipment Needed
- Medicine Ball (it’s literally in the name)
Step-by-Step Instructions
- Grab a medicine ball and stand tall with feet roughly shoulder-width apart.
- Reach the medicine ball high overhead.
- Using the core, pull the body down – hinging forward at the hips.
- Follow through with the arms and release the ball.
- Let the ball slam into the ground, catch it off the bounce and repeat for the designated number of reps.
Coaching Points
First and foremost, test how ‘bouncy’ your medicine ball is before starting. I can’t tell you how many times I’ve seen athletes almost have their face smashed by a Medicine Ball Slam bouncing much harder and rebounding much faster off the ground than they were anticipating.
Dead Bug
Equipment Needed
- None
How To
- Begin by lying on the floor on your back.
- Raise both arms straight up toward the sky.
- Bend both knees at a 90-degree and raise the legs until the knees are directly vertical of the hips.
- Brace the core and simultaneously lower the right leg and left arm toward the floor.
- The arm should end up six inches from the ground directly overhead.
- The leg should end up six inches from the ground directly below the hip.
- Return both back to the starting position and then lower the opposite arm and leg.
- Continue alternating back and forth, pausing and ‘locking-in’ each rep.
Coaching Points
The back will naturally want to arch as you go through this movement. Try not to let it. Keep the core braced and maintain a neutral torso.
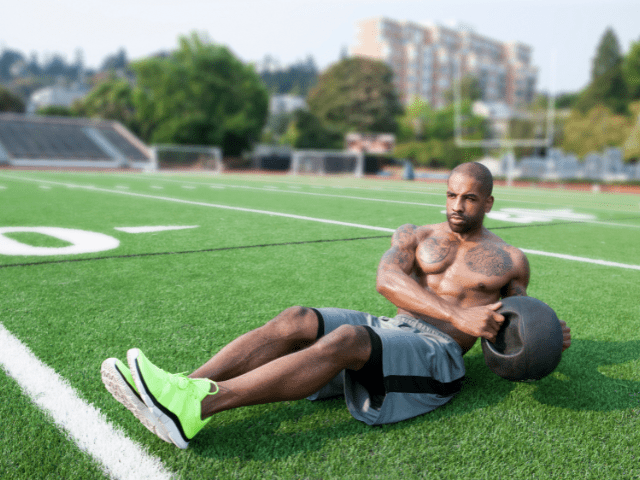
Seated Twist
Equipment Needed
- Medicine Ball
Step-by-Step Instructions
- Start by taking a seat on the floor and clasping your hands together.
- Slightly bend the knees and raise your feet roughly six inches off the floor.
- Start by rotating your torso to the left, taking your right elbow toward your left knee.
- Now turn your shoulders and rotate your torso to the right, now taking your left elbow toward your right knee.
- Keep legs mostly still and maintain the feet off the floor throughout the movement.
- Continue rotating back and forth until all reps are completed.
Coaching Points (Common Mistakes)
The biggest mistake I see with my athletes when doing Seated Twists is moving their hands back and forth instead of rotating through the core. The focus should be on the rotation. What the hands and arms do is merely a product of rotating through the torso.
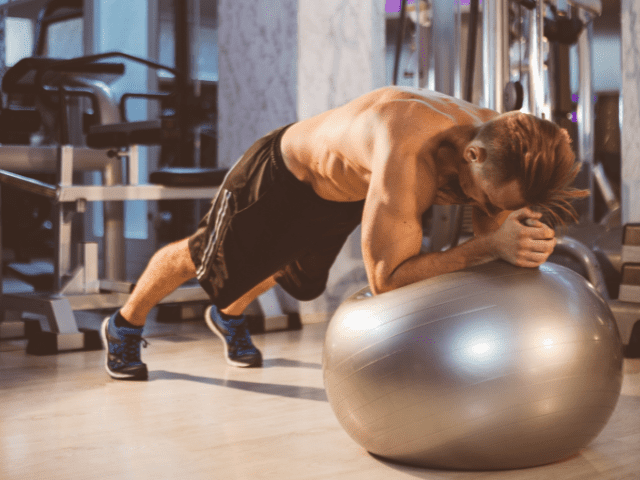
Stir The Pot
Equipment Needed
- Stability Ball (also sometimes called a Physio Ball)
Step-by-Step Instructions
- Start on your knees with the Stability Ball directly in front of you.
- Place your forearms on the ball and clasp your hands together.
- Now slowly lift up off of your knees, balancing yourself with your forearms on the ball and toes on the ground.
- You should now basically be in plank position, but with your forearms on a stability ball instead of the ground.
- Now work your hands into small circles. This should simulate, you guessed it, stirring a pot with a big wooden spoon.
- Work clockwise until all reps are completed and then switch and go counter-clockwise as well.
- Once all reps are completed lower back down to your knees.
Coaching Points
Take your time getting properly set up! If you’ve never done Stir the Pot before it can be surprising just how hard it is to balance yourself on a stability ball in this manner let alone shift in circles.
Hanging Straight Leg Raises
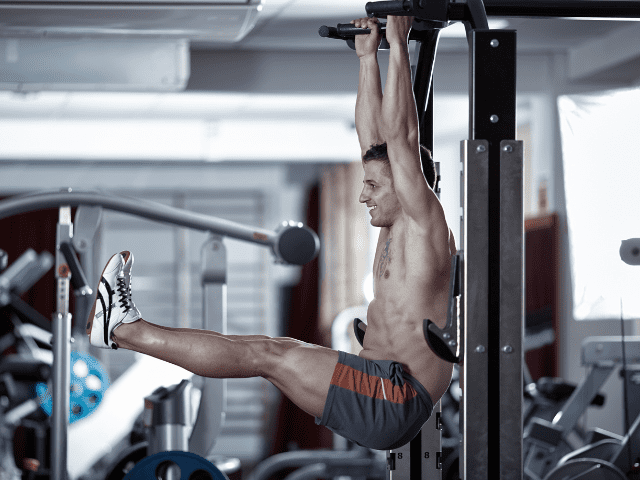
Equipment Needed
- Pull-Up Bar – Ideally a stand-alone pull-up bar or one connected to a squat rack although any sturdy object you can hang from will technically work.
Step-by-Step Instructions
- Find yourself a pull-up bar and grip the bar with an overhand grip.
- Engage your lats so your body doesn’t go limp once you begin to hang.
- Now hang from the bar and keeping your legs straight, drive them up to hip height (or slightly above hip height).
- Finally, actively lower your legs back to the starting position – don’t allow the legs to just swing down.
- Repeat until all reps are completed.
Coaching Points
The biggest issue that most of my athletes run into when doing Hanging Straight Leg Raises (or any hanging ab exercise for that matter) is how to keep from swinging out of control.
Suitcase Crunches
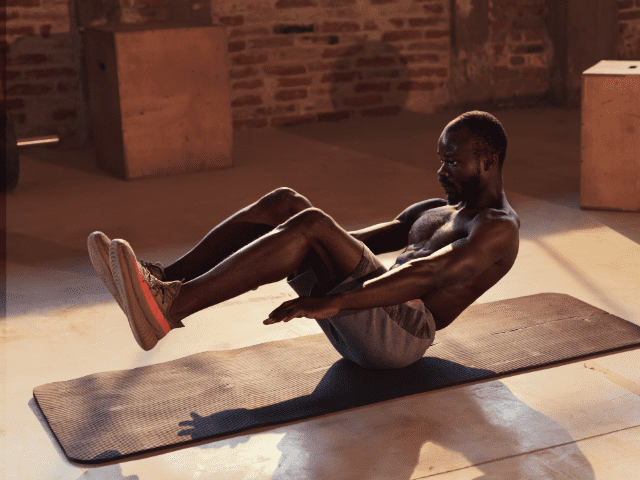
Equipment Needed
- None
Step-by-Step Instructions
- Start by sitting on the ground, balancing on your butt with legs and back up off the ground.
- Legs should be almost straight, feet roughly six inches off the ground. Torso should be leaned back at about a 30-degree angle.
- From the starting position, crunch up, bringing the knees and chest together above the hips (like a suitcase shutting)
- Lower back to the starting position and repeat until all reps are completed. (Feet and back should stay off the ground throughout the movement)
Coaching Points
If you keep your feet uncrossed during Suitcase Crunches, your groin will be forced to stay engaged. This creates a small added bonus to the exercise.
Toes to Bar
Equipment Needed
- Pull-Up Bar – Ideally a stand-alone pull-up bar or one connected to a squat rack although any sturdy object you can hang from will technically work.
Muscles Worked
- Abdominal Core Muscles (Rectus Femoris, Obliques Externus Abdominus)
- Quadriceps, Rectus Femoris
- Tensor Fasciae Latae (TFL)
- Secondarily: Back, Biceps and Forearms
Step-by-Step Instructions
- Find yourself a pull-up bar and grip the bar with an overhand grip
- Engage your lats so your body doesn’t go limp once you begin to hang
- Now hang from the bar with a slight flex at the elbow
- Keeping the legs straight, flex the core and lift the legs up until your toes touch the pull-up bar.
- Lower the legs under control to help keep them from swinging uncontrollably.
- Repeat for the designated number of reps
Coaching Points
The biggest issue that most of my athletes run into when doing Toes to Bar is how to keep from swinging, or better yet, how to properly utilize that swing as a positive and not a negative.
To keep from swinging, you have to actively lower your legs back down. If you ‘let your legs go’ and just allow gravity to take over you’ll completely lose control of the movement.
Ab Rollouts
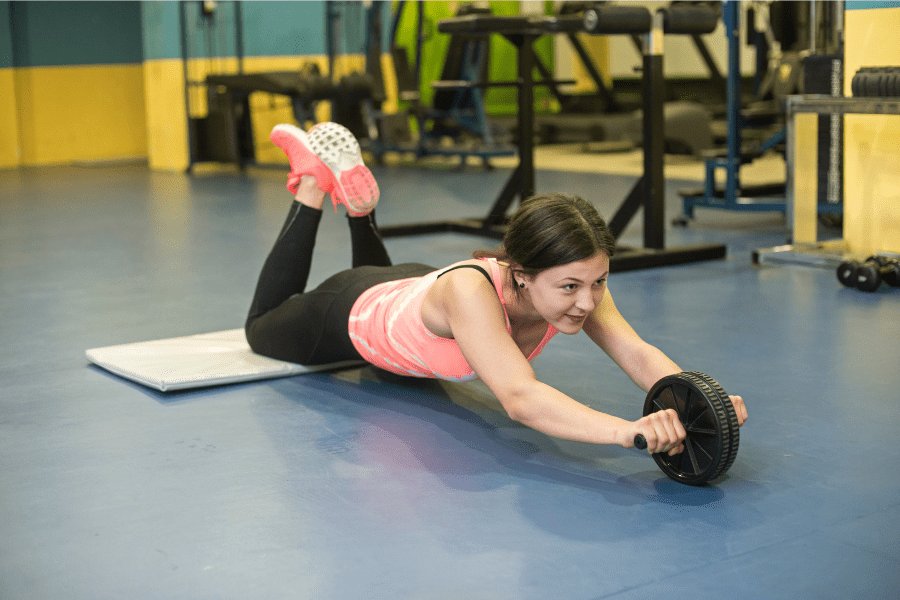
Equipment Needed
- Ab Wheel
OR
- Barbell with Bumper Plates on each side
How To
- Start on your knees with your hands on the Ab Wheel handles.
- Brace the core hard and begin rolling the wheel forward.
- Roll out until you feel you’re about to fall and then begin pulling the wheel back.
- Repeat until all reps are completed.
Coaching Points
Don’t allow your hips to stay behind you as you begin to roll forward when doing Ab Rollouts. Hips should stay relatively in line with the knees and shoulders, similar to a Plank.
Get Shredded… For Free
Get a free workout Monday through Friday, posted right here on Horton Barbell. These workouts are designed to help you get strong, in shape and look great at the beach!
Final Thoughts
Ab Machine Crunches are an excellent exercise for developing a strong core, however, sometimes Ab Machine Crunches are just not possible. You may not have the proper equipment, but you also may just want something a little different.
In these situations, you’ll need a Ab Machine Crunch alternative and I hope that at least one of the alternative exercises I’ve listed here fits what you were looking for.