DIY Workout Sandbag (Under $20!)
Sandbags are a great way to throw some variety into your workouts. I’m not talking about a few tiny sandbags either. I’m referring to a heavy sandbag that can hold up to 100 pounds. They can be used for lifting, carrying, pulling, pressing – you’re really only limited by your own creativity.
If you know me, you know that I don’t mind spending money where I think it matters (Uesaka Bar and Plates), but I really like saving money where I think I can (DIY Squat Stand and Platform).
So, now I just needed to figure out if I wanted to buy a sandbag or make my own DIY Workout Sandbag. It didn’t seem like that hard of a thing to make, so it really was just going to come down to price.
(Spoiler alert: they’re more expensive than you might think.)
Rogue makes a few really good sandbag options. We actually have some of the Rogue Feed Sacks here at the school. They’re heavy-duty and very well made. The 100lb bags currently go for $85 on Rogue. Iron Mind makes a ‘Tough-As-Nails‘ sandbag set that goes for around $70. These are a couple of the more budget-friendly sandbags too.
You can easily spend over a hundred dollars on a heavy-duty sandbag. Some of these sandbags also give you the option to buy the inner bags and filler material from them as well. Convenient, yes, but that convenience will cost you.
If you decide it’s worth spending the money to buy a sandbag to train with, go for it. But, for me, this was a project I wanted to DIY.
Links on this page may be affiliate links. If you make a purchase I may, at no extra cost to you, earn a commission.
DIY Sandbag Materials
There are four major components to making your own DIY Sandbag. There are a few different options you can use for each so I’m going to go over the general idea of what you need for each component and why first. Then I’ll discuss each in detail including what I used for my own bag.
The four components for making a Sandbag are:
- Outer Bag – Exactly what you would imagine. A big bag that everything is going to go in.
- Inner Bags – These are the smaller individual bags filled with filler material that will go inside the outer bag.
- Filler Weight – Material, commonly sand or pea gravel, that will fill up the inner bags and essentially be the weight.
- Duct Tape – The hallmark of most good DIY projects. Good ol’ duct tape.
Outer Bag
For the outer bag, first and foremost you need something that is going to be durable. A rugged material like canvas is ideal along with heavy-duty stitching. You’re going to be loading this thing up with a good amount of weight and picking it up and dropping it over and over again.
You want something that’s going to be able to hold up against that kind of punishment. You also want to get something that’s going to be big enough to hold the amount of weight you’re going to want to use. (More on that later)
A few good options for the outer bag are:
A Heavy Duty Canvas Bag – These can be found online, at Lowe’s or at a Military Surplus Store if you have one near you. A bag with drawstring that allows you to expand or tighten the amount of space you need is especially helpful.
A Workout/Duffel Bag – Try hitting up a thrift shop and grabbing an old workout bag. Be on the lookout for spots that may be super thin from wear and tear and about ready to give. Also, look for weak and/or frayed stitching.
As the old saying goes, ‘You’re only as strong as you’re weakest link.’ That certainly holds true here. If the bag has any weak spots, you best believe 100lbs of sand will make quick work of it.
Personally, I’m going to be using an Under Armour duffel bag. I have accumulated an obnoxious amount of duffel bags. In coaching, you generally get a new duffel bag (aka ‘travel bag’) each season. Then, if you go to a bowl game, you’ll usually get a bag as a bowl gift as well.
While I’m grateful for every piece of gear I receive, I have more bags than any human will ever need. When you’re doing a DIY project to save money there is no better resource than stuff you already have laying around the house!
One last quick note to keep in mind when selecting your Outer Bag.
You need a bag that is going to be big enough to fit the amount of weight you want to use. That’s the obvious part. However, you also don’t want a bag that’s much larger than what you need too.
When you have a lot of empty space within your Outer Bag then it allows the Inner Bags to shift and bunch to one end, or both ends. This can make the bag extra awkward to deal with.
Inner Bag
The Inner Bags are the bags that will hold the material you’re using for your weight.
So, what is the need for ‘Inner Bags’? Why not just throw all the sand in a bag and call it a day?
Two reasons:
First, adding Inner Bags adds a layer of protection between your sandbag and a complete disaster. If you use your sandbag long enough, it’s a matter of when, not if you end up with a hole in it. If all your sand or pea gravel is right in the main sandbag itself – I think you see where this is heading.
But, if you have your material in smaller individual bags then a hole in either an inner or outer bag can be addressed before you end up with a beach in the middle of your gym.
Secondly, by weighing out and marking smaller individual inner bags, you can quickly and easily adjust the amount of weight in a bag. I created two 20lb bags, two 15s and three 10s. This allows me to load up exactly how much weight I want to use for each workout. It’s no different than loading plates onto a bar.
I’m trying out both Contractor Bags and Freezer Bags for inner bags. If one ends up working better than the other, I’ll add that here. So far, both seem to be working really well.
Material for Weight

Next, you need something that is going to make up the actual weight of the bag. When deciding on what material to use for this there are a couple of things to keep in mind.
You want a material that is dense. This is one of the reasons I’m not a fan of crumb rubber. Crumb rubber is going to take up twice the amount of space for the same weight. This means a bigger, bulkier, more cumbersome bag.
The other being once I decide I don’t want/need the sandbag anymore I can dump the pea gravel or sand in my landscaping and be done with it. What are you supposed to do with 50lbs of crumb rubber when you don’t want it anymore?
Avoid material that has rough or jagged edges. Coarse landscaping rocks with rough edges will destroy your bags, not to mention your hands and shoulders.
Finally, get something cheap. There is no reason to spend a bunch of money when it’s absolutely not necessary.
The two materials that I recommend, which I’ve already mentioned a few times, are play sand and pea gravel. Both are super dense and very space efficient. Pea gravel is small, rounded and smooth and sand is, well, sand. Finally, you can buy a 50lb bag of either for about $4. That’s pretty hard to beat.
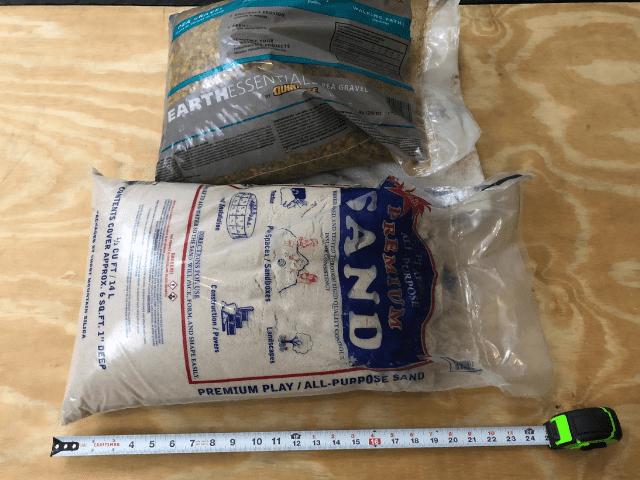
Both the pea gravel and play sand come in 0.5 cubic feet bags. The pictures are a little deceiving because the pea gravel is a bit more bunched up, but both bags are indeed the same size.
As far as weight goes, I weighed both bags when I got back from Lowe’s. The playsand came in at 46lbs and the pea gravel weighed 51.6 pounds. Pretty close and considering how cheap both are, it doesn’t really move the needle either way in my opinion.
Duct Tape
Last, but not least, duct tape. Duct tape is going to help us seal, secure and reinforce the inner bags.
Constructing The DIY Workout Sandbag
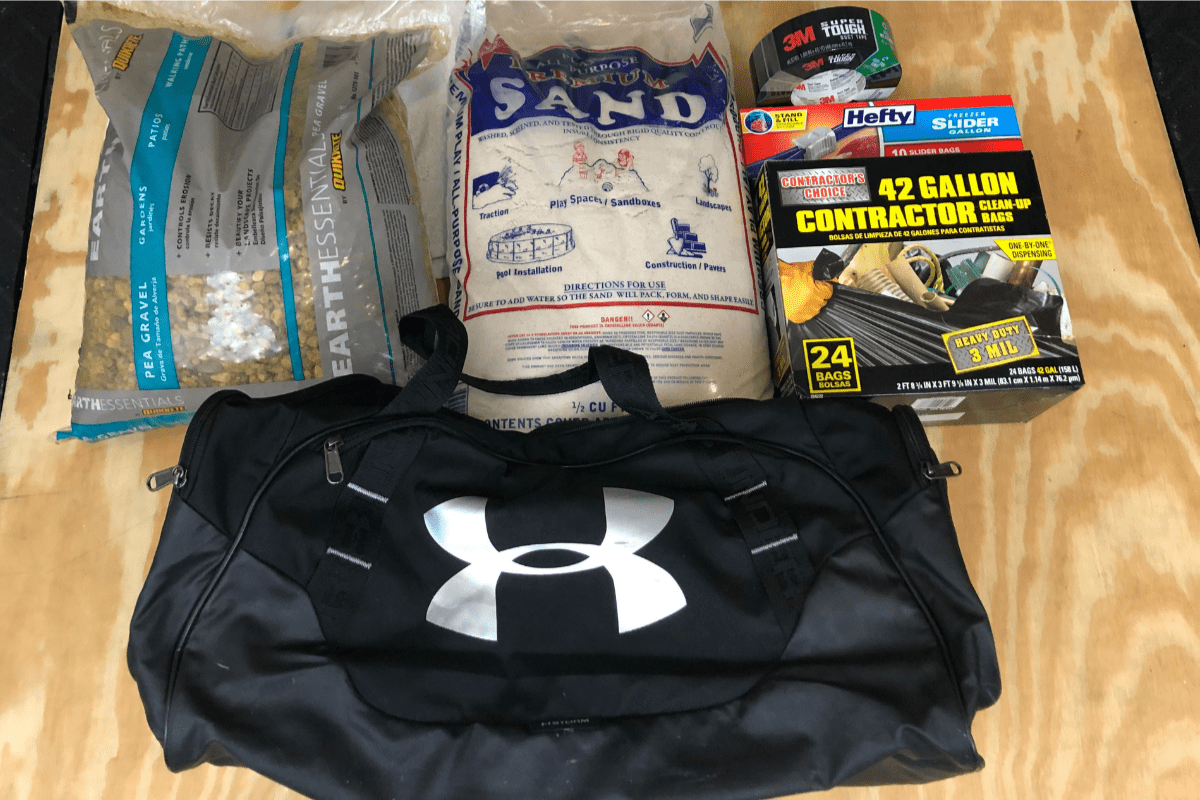
Materials I Used
| Component | Material Used | Cost |
| Outer Bag | Adidas Duffel Bag | Free |
| Inner Bags | Contractor Bags | $13.98 for 24 |
| Inner Bags | Hefty Slider Gallon Freezer Bags | $3.99 for 25 |
| Weight Material | Play Sand 50lb bag | $4.10 |
| Weight Material | Pea Gravel 50lb bag | $3.96 |
| Duct Tape | 3M Duct Tape | $6.98 |
A couple of notes on materials. If you already have a bag you can use like I did, that’s a big win. If not, you still won’t have to spend a ton of money on a bag. Look for canvas laundry bags like this one or hit up some thrift stores.
Assembly

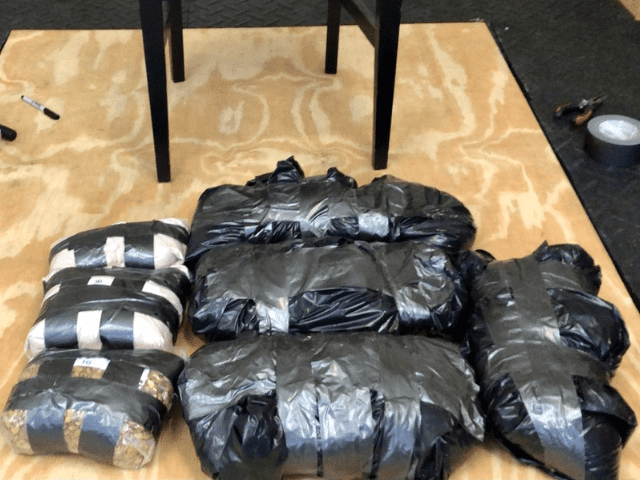
The actual assembly itself is probably the easiest part of the whole process. Simply pour your material into your inner bags, weigh it and use your duct tape to seal everything together. Your final bags are going to look something like this:
Pro Tip: When using your contractor bags, pour your filler material in until you have the amount of weight you want. Shift all the material to one side at the bottom. Then fold the bag in half length-wise. Now you can roll the bag end over end, all the way to the top. Then duct tape to seal.
Final Total Cost
Including bags and materials, my sandbag was ready to roll for under $30. If the freezer bags end up working as well as the contractor bags, then that would actually put me under $20. I’ve even got leftover contractor bags and duct tape I can use on my next crazy project. (And I can give Jen back her freezer bags)
That’s pretty good compared to spending over $100 on a commercial sandbag. Especially for what I plan on using it for which are occasional carries and picking up and pressing.
Final Thoughts
If you’re looking for a way to add some variety to your workouts, a DIY Workout Sandbag can be just the thing. I’ve got to use my new sandbag a few times now and I’m really looking forward to throwing it into my workouts from time to time.
If you want a heavy sandbag of your own, I’d highly recommend making your own. It’s super easy and relatively cheap to make your own really effective sandbag.
Stay Strong!

