
10 Best Hang Clean Alternatives For Power Development
Hang Clean is one of the most effective exercises for building explosive power. I’m a big believer in utilizing the Olympic lifts to help develop explosiveness in athletes and Hang Clean is one of my favorite variations.
However, sometimes you may find yourself needing an alternative for Hang Clean.
Maybe you don’t feel comfortable with your Hang Clean technique or maybe you’re just looking to add some variety to your workouts.
Whatever the reason, if you’re looking for an exercise to substitute for Hang Clean then you’re in the right place. I’m about to share with you 10 of my favorite Hang Clean alternatives including a few different variations and lifts using different equipment.
Alternatives to Hang Clean
The first five alternatives are other Olympic lift variations. They all differ in either their finish positions, equipment used or overall movement. Depending on your situation (available equipment, technical ability, etc), you may find one of these exercises a better fit.
The second five alternatives are all exercises that focus on power development through explosively training triple extension, but they are not Olympic lifts. If you’re not comfortable doing Olympic lifts yet, these movements offer many of the same benefits but are much less technical.
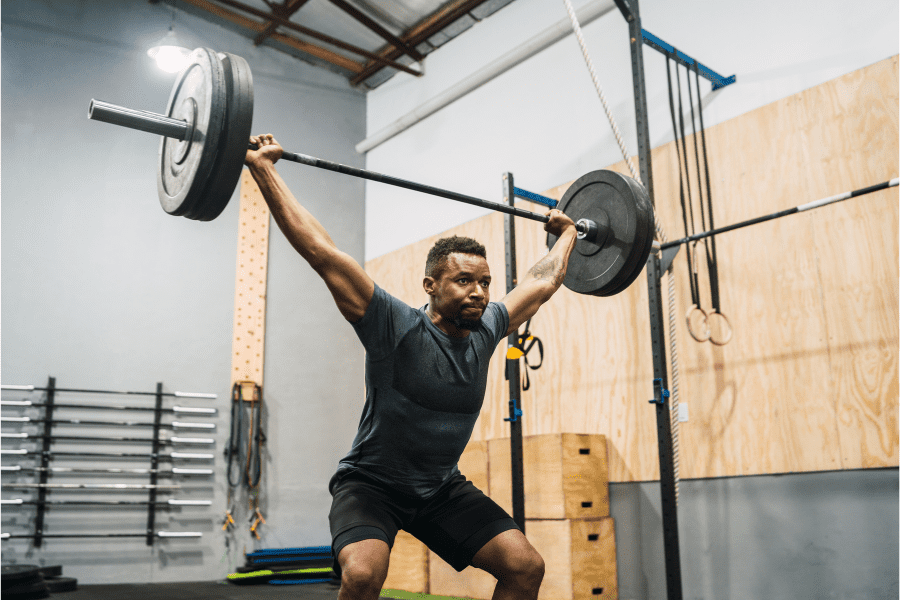
Hang Power Clean

Hang Power Clean is really more of a variation than it is a total Hang Clean alternative.
Hang Power Clean removes the catch in the full squat position. Instead, the bar is caught in a quarter-squat power position. This makes the lift slightly less technical and allows the lifter to focus more on the pull.
Instructions
- Select an appropriate weight on the barbell and stand with feet hip-width apart.
- Hold the bar with a hook grip, hands slightly wider than shoulder-width, and bar at mid-thigh level.
- Place a slight bend in the knees and hinge forward, lowering the bar just above the knees.
- Powerfully extend the hips and knees, pulling the bar upward with high elbows.
- As the bar ascends, drop under it slightly, catching it on your front shoulders while bending your knees.
- Extend your hips and knees and finish in a standing position, securing the bar on your front shoulders.
Coaching Points
Make sure to maintain a neutral, flat back during the hinge. One of the biggest mistakes that can lead to an injury is allowing the back to round during the hinge. This puts an excessive amount of strain on the spine as the athlete begins the movement.
If the athlete cannot maintain a flat back, lower the weight and incorporate more exercises that can improve the upper back strength needed to maintain a proper position like RDLs.
The dreaded rounded back can also occur if the lifter hinges too aggressively and quickly extend without maintaining a braced core. I usually see this when athletes are trying to ‘rock’ into the pull instead of getting properly set.
If the athlete is striking the bar on the thighs once it reaches the hip crease, then they must make sure that the bar doesn’t swing out away from them. The bar should stay close to the body throughout the entire second pull.
Hang Power Snatch
There are many advantages of substituting Hang Power Snatch for Hang Cleans. It’s less technical and much more beginner-friendly. The catch position is much easier to learn, especially when catching in a quarter-squat power position.
The weight is lighter in a snatch which means more bar speed. It also means that the lift is much more forgiving of technical errors because the weight on the bar is less.
How To
- Stand with feet hip-width apart, holding the barbell at hip level using a wide overhand grip.
- Slightly bend your knees while keeping your back straight and chest up.
- Quickly extend your hips and knees, pulling the bar upward. Engage your traps with a shrug.
- As the bar reaches its highest point, quickly drop under it by bending your knees.
- Catch the bar overhead with arms fully extended. Make sure your feet are flat on the ground.
- Extend your knees to a full standing position, keeping the bar overhead.
Coaching Points
One of the biggest mistakes lifters make is to cut the pull short and not reach full extension. Don’t be in a rush to pull with the arms as that will cut your power short on the movement.
Clean Pull

A Clean Pull is a variation of the Clean that removes the catch entirely. The lifter begins in a starting position from the floor, but never transitions to the catch.
This is a great variation of the Hang Clean for a number of scenarios.
The catch can be a tough part of the lift for some lifters to grasp, the Clean Pull removes it. Athletes who are in-season don’t have to worry about jamming their wrists with a poor catch. Finally, it allows the lifter to purely focus on generating explosive power.
Step-by-Step Instructions
- Choose a suitable weight on the barbell and position it over your mid-foot.
- With feet hip-width apart, grip the bar with hands slightly wider than shoulder-width, maintaining a flat back and shoulders over the bar.
- Lift the bar by powerfully extending the hips and knees, keeping it close to your shins.
- As the bar passes your knees, explosively extend your hips and rise onto your toes, shrugging your shoulders.
- The bar should reach maximum height, with your body fully extended and shrugging upwards.
- Control the bar back down to the starting position.
Coaching Points
An easy way to get your grip in the right position is to place your hands one thumb length away from the start of the knurling of the bar. This width will work for 90% of lifters. Wider athletes may end up sliding their hands just a bit wider and vice versa for narrow athletes, but it’s a good starting point for anyone.
One of the biggest mistakes with Clean technique is that lifters will shoot their butt up first, locking their knees out and then they end up pulling the bar with their back instead of their legs. This is most often caused by lifters trying to rush the first pull too much. Don’t get ahead of yourself.
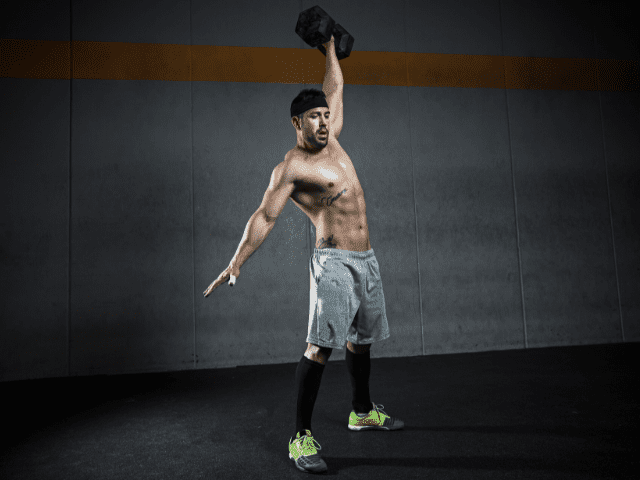
Dumbbell Hang Clean

Don’t have a barbell? The Dumbbell Hang Clean is a great Hang Clean alternative that uses dumbbells instead of a barbell.
Dumbbells also give lifters more versatility. If you’re unable to Clean with a bar due to an injury to one arm and you are cleared to lift with the other arm then Dumbbell Hang Clean can be a perfect solution (as shown in the pic above).
Instructions
- Select a pair of dumbbells that you can manage effectively through the movement.
- Stand with feet hip-width apart, holding the dumbbells in front of you with palms facing your thighs.
- Slightly bend your knees and hinge forward at the hips, lowering the dumbbells towards your knees.
- Swiftly extend your hips and knees, pulling the dumbbells upward by driving your elbows high.
- While the dumbbells are elevating, rotate your wrists under them and catch them at shoulder height, elbows pointing forward.
- Control the dumbbells back to the hanging position, maintaining a neutral spine.
Coaching Points
Make sure to maintain a neutral, flat back during the hinge. One of the biggest mistakes that can lead to an injury is allowing the back to round during the hinge. This puts an excessive amount of strain on the spine as the athlete begins the movement.
If the athlete cannot maintain a flat back, lower the weight and incorporate more exercises that can improve the upper back strength needed to maintain proper position like RDLs.
The dreaded rounded back can also occur if the lifter hinges too aggressively and quickly extend without maintaining a braced core. I usually see this when athletes are trying to ‘rock’ into the pull instead of getting properly set.
Tired of coming up with your own workouts? But don’t want to pay an arm and a leg?
I post workouts 5 days a week right here. (Did I mention they’re free?)
Single Arm Dumbbell Snatch
If you’re looking for a Hang Clean alternative that is easy to learn and helps develop explosive power, then Single Arm Dumbbell Snatch might be a great alternative for you.
The Single Arm Dumbbell Snatch is less technical than all the other Olympic variations listed above. If you can learn how to get in a proper starting position – flat back, braced core, proper hinge – then you can do Single Arm Snatches.
How To
- Select a dumbbell that is appropriate for your strength and experience level.
- Stand with feet shoulder-width apart, holding the dumbbell in one hand, positioned between your legs.
- Begin with a slight bend in the knees and hinge at the hips, lowering the dumbbell towards the ground.
- Powerfully extend your hips and knees, pulling the dumbbell upwards in a straight line.
- As the dumbbell ascends, begin to pull your elbow underneath it.
- Fully extend your arm overhead, catching the dumbbell in a locked-out position.
- Control the dumbbell back to the starting position, maintaining good posture.
Coaching Points
The two biggest mistakes that I see with Single Arm Snatches are not keeping the dumbbell close to the body on the way up and letting the dumbbell ‘yank’ the shoulder down as it comes back to the starting point.
The dumbbell should travel close to the body all the up until it gets about head height, then rotate the elbow, drop the hips and catch. Don’t allow it to swing forward out away from the body.
The second technique flaw is not staying braced through the return of the dumbbell to the starting position, often times from being in too big of a hurry to knock out reps. Letting the dumbbell, especially the heavier you get, yank the shoulder down at the bottom of the rep is asking for trouble.
Kettlebell Swing

As this list progresses, the exercises continue to get more and more beginner-friendly. Like all the exercises listed as Hang Clean alternatives, Kettlebell Swings focus on an explosive hip drive.
The thing that makes Kettlebell Swings somewhat unique is the portability of the Kettlebell. You can take a kettlebell out to the field and incorporate it into a circuit or even throw it in your car and take it with you on a road trip.
Step-by-Step Instruction
- Choose an appropriate weight that you can swing with control.
- Start in a standing position with feet shoulder-width apart, holding the kettlebell with both hands in front of you.
- Push your hips back, bending slightly at the knees, and lowering the kettlebell between your legs.
- Powerfully extend your hips and knees, swinging the kettlebell forward and upward to chest height.
- At the peak, your body should be in a straight line from head to heels.
- Allow the kettlebell to swing back down, hinging at the hips, and preparing for the next repetition.
Coaching Points
Kettlebell Swings are a great movement to train rapid hip extension and flexion. Remember to always keep a neutral spine (DO NOT ROUND YOUR BACK).
Choosing the proper kettlebell weight is important. Heavier is not always better. Because of the rapid nature of the kettlebell swing, the emphasis should be on velocity, speed, and power.
Med Ball Cannonballs

Grab a medicine ball and throw it as high as you can. That’s essentially what a Med Ball Cannonball Throw is.
That’s why it’s one of the best Clean alternatives to use not only as an exercise to develop power but as a teaching tool to begin to learn body positioning for Olympic lifting. One can learn how to set the back, how to hinge, brace and drive – all components of a Hang Clean – but with much less risk with a medicine ball.
How To
- First, make sure you have enough ceiling height to be able to do Cannonballs. I recommend doing them outside to avoid this issue altogether.
- Grab the ball with both hands cradling under the ball. Stand tall, feet shoulder-width apart.
- Pull the shoulder blades back, engage the lats and core, slightly bend the knees and hinge forward at the hips.
- Allow the medicine ball to fall in between the shins.
- You should now be in a good athletic position that looks very similar to the starting position of a Hang Clean.
- From here, explosively drive the feet through the ground and aggressively extend the hips and throw the ball as high as possible*.
- Allow the ball to hit the ground, grab it, then reset and repeat.
Coaching Points
Do NOT try to catch the ball directly out of the air. This is a great way to jam a wrist or a finger. Allow the ball to hit the ground first before grabbing it for the next rep.
*Cannonball Throws can either be done straight up in the air or behind you to a partner. If working with a partner, stand facing away from them and throw the ball at about a 45 degree angle. The goal is to throw the ball as far as possible in the air.
Box Jumps

Almost every athlete’s favorite plyometric drill, Box Jumps, can also be used as a Hang Clean alternative.
Box Jumps use your own bodyweight as resistance to help develop the ability to generate force. For added resistance, throw on a weighted vest for your Box Jumps.
Step-by-Step Instructions
- Select a box or platform that is a challenging, yet safe height.
- Stand facing the box, feet shoulder-width apart, and a few feet away from it.
- Begin by slightly bending your knees and hips, arms back, readying for the jump.
- Powerfully extend your hips and knees, swinging your arms forward and propelling your body upward.
- Aim to land softly on the box with both of your feet fully on it, knees slightly bent.
- Stand straight, stabilizing yourself on the box.
- Carefully step back down to the starting position, one foot at a time.
Coaching Points
Pick a box for Box Jumps that is an appropriate height. You should land on the box in roughly a quarter-squat position. All too often I see athletes do Box Jumps on a box that is way too high, causing them to have to land in a full squat position.
This is wrong for two reasons. First, picking your feet higher so you can land in a full squat doesn’t actually mean you jump any higher. Second, having to land in a full squat to make it onto the box eliminates any room for error. If you jump perhaps even an inch not high enough you could end up missing the box.
Tire Flips

If you’re looking for a Hang Clean alternative to add some variety to your program, Tire Flips are a great hip-dominant movement that closely mimics a Hang Clean.
If your workouts have gotten a bit stale and you have access to a giant tire good for flipping, shake your routine up with Tire Flips.
How To
- Choose an appropriate tire size that you can flip safely.
- Stand facing the tire, feet shoulder-width apart.
- Squat down and grip the tire with your fingers under the edge, arms fully extended.
- Take a deep breath, tighten your core, and keep your back flat.
- Drive through your heels and extend your hips and knees, lifting the tire off the ground.
- As the tire reaches knee height, reposition your hands and push it forward.
- Extend your arms and hips fully to complete the flip.
Coaching Points
The biggest key to Tire Flips is perhaps in finding the right tire.
Every school I’ve ever worked at had big tires that were used for Tire Flips. However, the size and weight of these tires have all been drastically different. They’ve ranged from tires that were barely heavy enough to be worth using to tires that took two and sometimes even three football players to flip.
Just like with Deadlifts and Power Clean, it’s extremely important to drop the hips, use the legs and keep the back flat. Once fatigue starts to set in I generally see athletes resort to using more back than legs. If form reaches this point then it’s time to stop flipping the tire.
Hill Sprints

This last exercise may be a bit outside the box, but Hill Sprints can make an excellent Hang Clean alternative.
The angle of the sprint changes the angle of the leg when it strikes the ground. This angle is very similar to the starting position of a Clean. And both exercises emphasize explosive triple extension.
Finally, what makes Hill Sprints a particularly great substitution is that they can provide some of the same benefits and require zero equipment. All, you need to find is an upslope to sprint on.
Get Shredded… For Free
Get a free workout Monday through Friday, posted right here on Horton Barbell. These workouts are designed to help you get strong, in shape and look great at the beach!
Final Thoughts
Hang Clean is an excellent exercise for developing power and explosiveness, but sometimes Hang Clean just isn’t an option.
You may not have the proper equipment available to you, you may not be comfortable with the technique, or at other times you might just be looking to add some variety to your training program.
In these situations, you’ll need a Hang Clean alternative and I hope that at least one of the exercises I’ve listed here fits what you were looking for.