
The 7 Best Upper Body Exercises For Golfers
Having a strong upper body is essential for golfers. A strong upper body will help you hit farther and be resilient to injury. It is even more important that golfers train their upper bodies intelligently.
You need to consider your shoulders, elbows, and wrists in every movement that you perform. Upper body training is not about getting jacked and pumped up like a bodybuilder. Training the upper body for golf is all about functionality, sport-specific, low risk-to-reward ratio movements, that will directly carry over to the course.
To gain strength in the upper half, I think the best implements are barbells, dumbbells, and kettlebells. These implements will engage the most musculature and can be trained and overloaded over time. Never sacrifice your form for weight!
The neurological training benefits are extremely beneficial for all athletes. These compound movements will train the muscles to gain power and strength in the upper body. You are not going to see a lot of bodybuilding or bicep and tricep exercises here. Compound movements train these muscles naturally anyways.
I recommend these movements in the early off-season, fall season, winter, and in-season training regimen. How heavy, how often, and what exercises you are using are determined by the competition schedule and your training readiness.
In this article, I will be going over the 7 best upper body exercises for golfers to help you stay healthy and hit farther!
Upper Body Exercises For Golf
Spider-Man Push-Up
One of my favorite push-up variations, the Spiderman Push-Up trains horizontal pushing strength and lower body coordination.
This is a great challenge for golfers looking to gain upper-body and core strength, as well as lower-body coordination and flexibility.
Assume a push-up position. As you lower yourself down, bring your right leg up as close to your elbow as you can. As you push back up, return the moving leg to the starting position. Alternate legs until all reps are complete for the set.
Step-by-Step Instructions
- Begin in a push-up position with your hands slightly wider than shoulder-width apart and your toes on the ground.
- As you lower yourself towards the ground, lift your right foot off the floor and bring your right knee towards your right elbow.
- At the bottom of the push-up your knee and elbow should be almost touching.
- Now push yourself back up to the starting position. Straighten your right leg and return it to the ground.
- Repeat the same movement on the left side, bringing your left knee towards your left elbow as you lower yourself down.
Coaching Tips
Keep your core engaged, your back straight, and your elbows close to your body as you perform the movement.
As you become more comfortable with Spiderman push-ups, you can gradually increase the difficulty level by adding more reps or sets, or by performing the exercise on an unstable surface such as a medicine ball.
Pull Ups
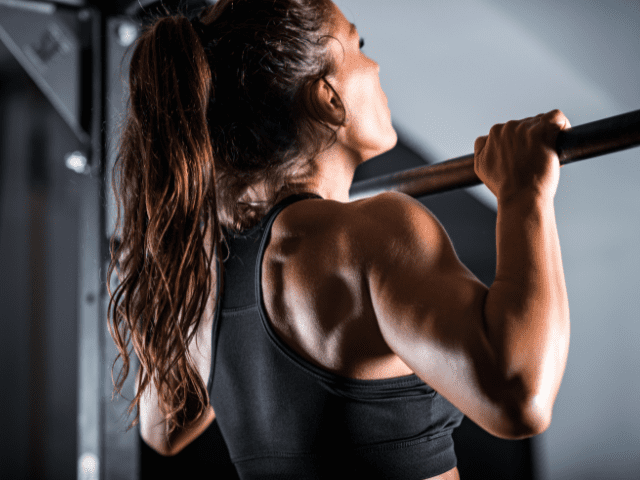
A strong posterior chain is essential for shoulder health and upper body strength. The Pull-Up trains this posterior chain (Lats, upper back, rear delt, rotator cuff) to be strong and resilient. Another added benefit of the pull-up is core and lower back stabilization.
A full range of motion in your pull-ups is critical for success here. I like to progress athletes into pull-ups. We initially will start with an eccentric phase, followed by an isometric, and finally a concentric one. I sometimes have athletes use bands to help with their pull-ups initially.
Step-by-Step Instruction
- Approach the pull-up bar and grab the bar with a pronated grip (palms facing away).
- Use a bench to get to the bar if it is too high.
- Later in the article, I will talk about variations, alternatives, and modifications where the supinated (palms facing in) grip will be discussed.
- Squeeze the bar and engage the core muscles and do not cross your legs.
- Engage the upper back and pull up until your chin is over the bar.
- Pause for 1 second with your chin over the bar.
- Slowly lower yourself back to the starting position.
Coaching Points
Take your time and master the pull-up. The benefits of doing sound pull-ups will pay dividends for your shoulder health and the potential to maximize your upper body strength.
If you’re not ready for the pull-up, don’t worry! You can start with Inverted Rows and Lat Pulldowns to gain strength. I also recommend straight arm hanging and isometric holds with your chin over the bar. These are great alternatives that will help you in the pull-up progression.
Alternating Dumbbell Bench Press
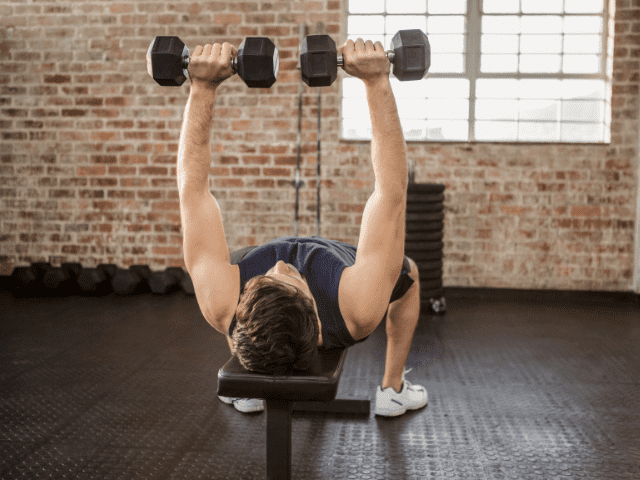
One of my favorite horizontal pressing movements, the Alternating Dumbbell Bench Press is a great option for golfers.
This pressing movement is great because it can be overloaded, trains single-arm strength (sport specific), shoulder stability, and is extremely joint friendly.
Step-by-Step Instructions
- Grab a pair of dumbbells and a bench.
- Sit on the edge of the bench with dumbbells resting on each thigh.
- Lay back on the bench and press both dumbbells to full extension.
- Now, lower the right dumbbell down to just outside the chest, keeping the elbow at roughly a 45-degree angle to the body.
- Press that dumbbell back up to full extension.
- Next, lower the opposite dumbbell down, same as the first, and press back to extension.
Coaching Points
Hold and stabilize the non-repping arm at full extension and only rep one dumbbell at a time. As the arms begin to fatigue, you may find one (or both) arms start to drift down as you’re repping the opposite arm. Try to keep that opposite dumbbell pressed at full extension!
Don’t turn the movement into a ‘piston-pumping’ type action. I’ll see athletes that will have one dumbbell going up at the same time the other is going down. Keep one dumbbell at extension until the opposite rep is completed.
Some will teach to keep the ‘resting’ dumbbell at or on the chest while the other arm is repping. Personally, I much prefer to keep the non-repping arm extended because helps to improve shoulder stabilization.
Bent-Over Barbell Row From Pins
A great horizontal row that trains the posterior chain is the bent-over barbell row from the pins. The Bent-Over Barbell Row from the pins is a great movement to help golfers because the setup is fairly similar to the way we approach the ball and apply force from a bent-over position.
Set the pins on the rack so that the barbell is at knee height. Hinge at the waist and maintain a neutral spine as you grab the barbell with a thumb width from the knurling.
Keep that bent-over position and row the barbell in as much as you can until it touches your abdomen. Slowly lower the barbell back to the pins. Reset each rep and pull from a “dead stop” each time.
One Arm Dumbbell Row

A classic horizontal row that I love for golfers, is the One Arm Dumbbell Row. This is a great rowing variation for single-arm training.
An awesome benefit of this variation is the non-rowing shoulder needs to stabilize as the other performs the row. Because your positioning is perpendicular to the floor, you are also training cross-body tension, engaging that core, and resisting rotation.
We know anti-rotation in the gym will aid in our ability to display rotational power on the course, so this is a great movement to train often!
Step-by-Step Instructions
- Place a dumbbell next to a bench.
- If rowing with the right arm, place the left knee and left hand on the bench. Keep the right foot flat on the ground.
- Make sure the back is flat (neutral) to slightly arched.
- Brace the core and pick the dumbbell up.
- Row the dumbbell up, keeping the elbow close to the body as the dumbbell raises.
- Squeeze the back at the top of the rep and then lower the dumbbell down until the arm is fully extended.
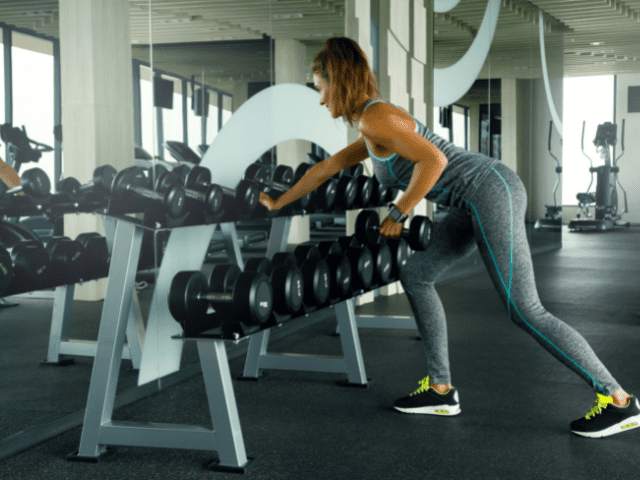
Coach’s Note: *One Arm Rows do not have to be done with one knee on a bench. You can keep both feet flat on the ground and lean forward and brace yourself with your off-hand on something sturdy.
Coaching Points
The most common mistake I see athletes make when doing One Arm Rows is not maintaining a flat back. The back should stay engaged and slightly arched – similar to the starting position of a Deadlift. Do not let the back round as this can cause unnecessary stress on the spine.
Also, do not twist and turn while rowing. You’re not starting a lawn mower. If you need to use your whole body to twist and rock the weight up then the dumbbell is too heavy. Lower the weight and maintain proper form.
Half Kneeling Single-Arm Dumbbell Press
One of my favorite shoulder-friendly pressing movements, the half kneeling single-arm dumbbell press is a great movement for golfers to gain strength in the overhead pressing pattern.
This is a great exercise for golfers because overhead strength and stability are often neglected in their training. I also love dumbbells as pressing implements because they force the athlete to train with a single arm and stabilize each movement.
Step-by-Step Instruction
- Take a kneeling position. One knee up and the other down. Bring your toe in on the down leg so that you are on the tip of your shoes
- If you have your right knee up, grab the dumbbell in your left hand. Face the palm toward you.
- Brace the abdomen and upper back. Make your torso as tall as possible and stay rigid throughout the entire movement.
- You may find it comfortable to put your non-pressing hand on your hip or extended out to the side for balance.
- Press the dumbbell vertically, finishing with the bicep very close to the ear. Lock in the rep at the top and slowly return to the start.
- Focus on your balance. The half-kneeling position should challenge your core control and ability to stay tall and rigid as you press.
Coaching Points
I am a huge fan of the tall-kneeling position. It challenges the lifter to balance, stay tall and rigid, and disallows the legs from cheating in helping the press.
Feet Elevated Inverted Row (On a Med Ball)
Horizontal rows are one of the key components of a healthy golfer’s strength training routine. One of my favorite rows is the feet elevated Inverted Row.
This is a challenging variation because as you elevate the feet on the med ball, you have to stabilize the core and lower body as you row. I recommend a pronated grip.
RELATED –> Check out my favorite core exercises to improve your golf game.
Remember, a full range of motion is critical here. Hang all the way down, row your body as one unit, squeeze the shoulder blades, and lock in each rep. Horizontal rows help balance out the shoulder and train those posterior chain muscles to be strong and resilient.
Online Strength Programs
- 1-on-1 Online Coaching
- Sports Performance Programs for Football, Basketball, Soccer & More
- Programs for Former Athletes (Legends) Who Still Want to Train Like Athletes
- Programs for Adults Who Want to Get Healthy (and look great at the beach!)
- Use Code “HB10” to Get 10% Off Today
Final Thoughts
Developing upper body strength can provide a ton of benefits for a golfer.
Being stronger can help you hit the ball farther and, more importantly, increase your resistance to injury – increasing the chances you’re healthy and able to play at your best!
While the exercises listed above are by no means the only exercises you can do to improve your upper body strength for golf, they are all great options that you can incorporate into your training.
Related Posts
The Best Upper Body Exercises to Improve Your Golf Game
No Equipment? No Problem! 10 Bodyweight Exercises for Golfers