Build a DIY Squat Rack for under $60 (Step by Step Guide)
Squat Racks are expensive. I’ve been a part of 3 college weight room builds and have priced out more equipment than I care to admit. What I can tell you with absolute confidence is that buying gym equipment can get really expensive, really fast.
One of the major expenses in the budget are squat racks.
There are major differences though between the squat rack you need in a college weight room and the squat rack you need in your home gym. The squat rack in a college weight room needs to be able to hold up to the wear and tear of dozens of athletes EVERY day doing a huge variety of workouts.
However, the squat rack for a home gym only needs to be able to function for what you specifically need it to do. For me, I needed a Squat Rack that allowed me to, well, squat. That’s it. No safety bars, no pull up bar – just a rack I could squat off of.
As long I wouldn’t have to clean weight off the floor, press it over my head and onto my back to back squat, I’d be happy.
Before I even thought about a DIY squat rack, though, I went squat rack shopping online.
All I needed was something simple and basic, but the cost to buy a squat rack was still over my budget at the time so I decided a wooden squat rack I could build myself was worth taking a shot at.
This article may contain affiliate links. If you purchase through one of these links I may, at no extra cost to you, earn a commission.
Homemade Squat Rack Materials
Everything combined cost me less than $60. Here is everything I used:
| Item | Cost | Total |
| 4 in. x 4 in. x 6 ft. #2 Ground Contact Pressure-Treated Timber | $6.57 | $6.57 |
| 2 in. x 8 in. x 10 ft. #2 Prime Ground Contact Pressure-Treated Lumber | $9.67 | $9.67 |
| 4 in. x 4 in. x 10 ft. #2 Ground Contact Pressure-Treated Timber | $11.57 x 2 | $23.14 |
| 1-1/2 in. Zinc-Plated Corner Brace Value Pack (20-Pack) | $9.69 | $9.69 |
| #6 x 3/4 in. Philips-Square Drive Flat-Head Full Thread Zinc Coated Multi-Material Screw (45 per Box) | $2.50 x 2 | $5.00 |
| #8 x 3 in. Philips Bugle-Head Coarse Thread Sharp Point Polymer Coated Exterior Screw (1 lb. – Pack) | $8.97 | $8.97 |
| Total | $58.04 |
Technically this could almost be, ‘Build a DIY Squat Rack For Under $50’, because I only used 6 of the 3 inch nails and have over a hundred leftover. Regardless, this is going to be a super cost-effective squat rack.
Having said that, make sure you don’t skimp on materials. You’re definitely going to save money by building a homemade squat rack, but it still needs to be SAFE. Make sure to get good, sturdy wood and quality hardware.
The last thing I want to say before I get into all the details of how I built my wooden squat rack, I want to make this perfectly clear. I am not a carpenter or professional builder of any kind. All of the information in this DIY squat rack guide is for entertainment purposes only.
Build this or anything similar to this at your own risk.
DIY Squat Rack – Step by Step Instructions
Step 1 – Make a Plan
Figure out where you want your DIY squat rack to go.
For me, I wanted to use the wall on the far side of my home gym away from the garage door. This way I would still be able to pull my car in when and if I ever needed to.
Next, I located where the studs were in the wall. I wanted to anchor two 2x8s on the wall and attach everything else to them.
When you’re deciding where you’re going to place everything, always keep the bar in mind.
If you end up in a corner of your home gym like I did, make sure you have enough space not just for the bar, but to be able to take plates on and off the bar as well.
When you’re deciding where the top of your rack is going to be (the horizontal beams), think about where you grip the bar and where the bar ends and the cap begins.
Get any of these widths wrong and you’re in trouble.
Measure everything 3 times if need be. I basically made a complete diagram on my wall of where everything was going to go. I can’t emphasize this part enough.
Finally, an interesting observation I noticed when I was locating my studs. I have a large closet on the far end of my garage that is behind the wall where I set up my rack. It is a couple of steps up from the garage floor itself.
Apparently, the studs in that wall only go down to the floor of the closet and not the garage floor itself.
I’m really glad I double checked the studs for my bottom 2×8. If I hadn’t, I would have anchored into just drywall. Not sure if that is helpful for anyone else, but wanted to share.
Step 2 – Get Your Materials
Check out the table above for a detailed list of everything I used. Here is why I chose what I chose. I went with the 2x8s because I wanted something that I could anchor to the wall with enough surface area to easily anchor my 4x4s to.
I chose the 4x4s because I felt like 4x4s would be strong and sturdy enough for my squat rack to be able to handle and support a bar and a decent amount of weight (not as much as I used to squat, but I digress).
I purchased all the materials for my DIY squat rack online and then did a curbside pickup.
The brackets I got are probably smaller than I would have bought if I had seen them first. I was trying to weigh the cost and the next size bigger I could find was significantly more expensive. I figured I could double these up if need be and still come out cheaper which is exactly what I ended up doing.
I’m satisfied with how it turned out, but if I would have changed any of the materials I got, it would be the brackets.
The 3 Inch Screws worked great for anchoring the 2x8s and the 3/4 inch screws worked great with the brackets.
Step 3 – Here We Go!
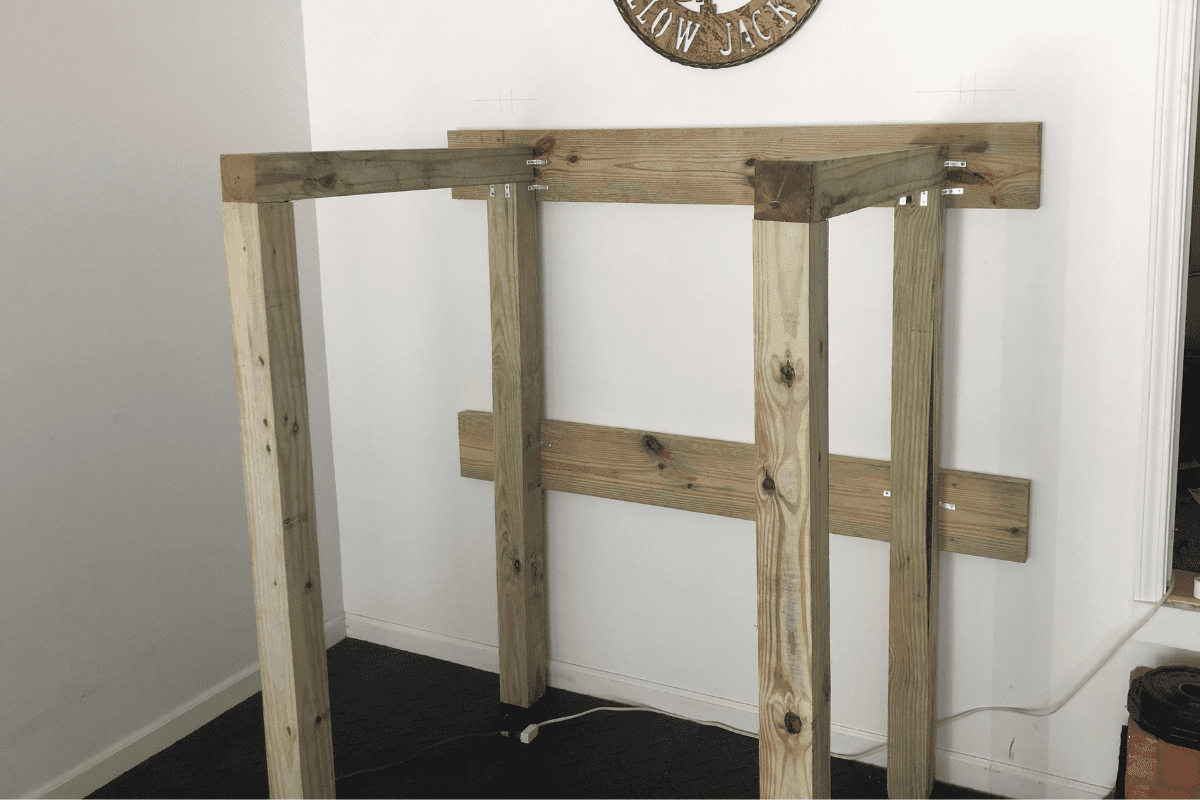
First, figure out what the height of your DIY squat rack is going to be.
I’m 6’4. If you’re 5’8, your squat rack is probably going to look different than mine. Your upper 2×8 needs to be at a height where you have enough room to anchor the vertical and horizontal boards.
I ended up buying one 2x8x10 and then sawed it in half to get two 5-foot boards. By the way, I sawed everything with a $10 hand saw. If you don’t have a power saw, don’t worry, I don’t either and you really don’t need one for this.
Next, (I’m really ticked at myself for not having a pic of this) I leaned the two 4x4x6s against the wall to line up and hold the 2×8 in place for me to drill into the wall. Use a leveler to make sure it’s straight and screw it into the studs that you already marked off.
Next, measure and cut one of the 4x4x10. The length should be whatever your finished final height is minus 4″ to take into account the horizontal 4×4 that is going to sit on top of the vertical beam.
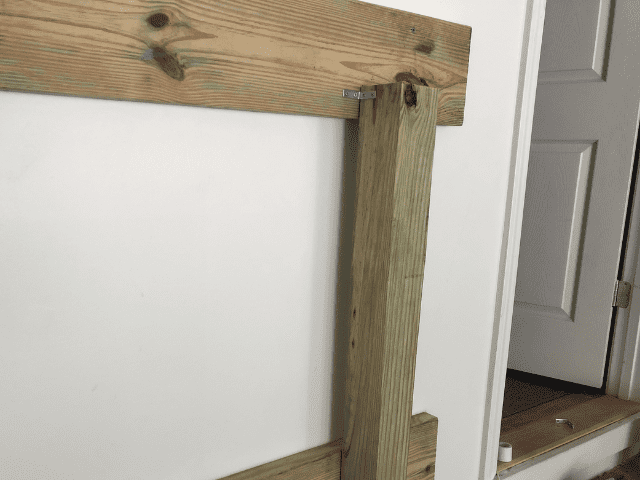
You should now have two 4x4s that are roughly 5 feet long depending on your height. Use your brackets to anchor the beams to both the lower and upper 2x8s.
Go ahead and cut your front two vertical beams to the same height as the ones you just anchored to the wall.
Measure and cut your horizontal beams to your desired length. For me, I wanted enough room from the wall so I wouldn’t be running the risk of putting plates through the wall, but I didn’t want too much room for a few reasons.
First, the longer the horizontal beam the higher the stress a barbell laying in the middle of that beam will be.
In my opinion, the more compact everything is on a homemade squat rack the more sturdy it’s going to be in general.
Finally, and this was a personal preference for me, I still wanted to leave enough room that I could still pull my car into the garage when and if I wanted to.
I cut my horizontal beams to be 3 feet long. After using my squat rack (really more of a squat stand) for a few weeks I think I could have even gone a little shorter. Two and half feet may have been ideal, but I’m good with how the 3 feet boards turned out.
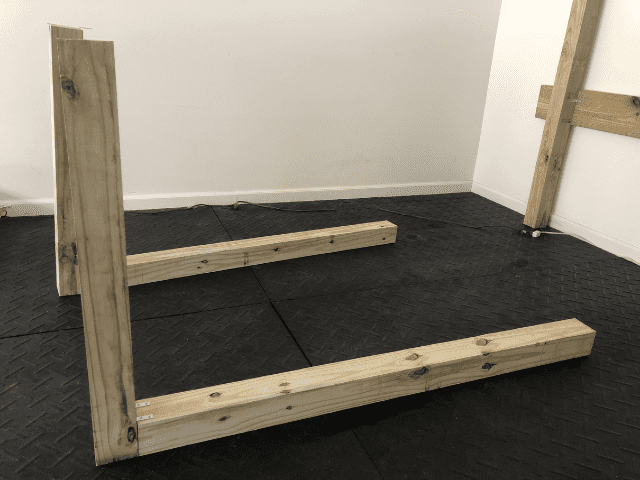
The next couple of steps can be done in any order. I ended up attaching the horizontal beams to the front vertical beams and then set the pair in place on top of the vertical beam on the wall.
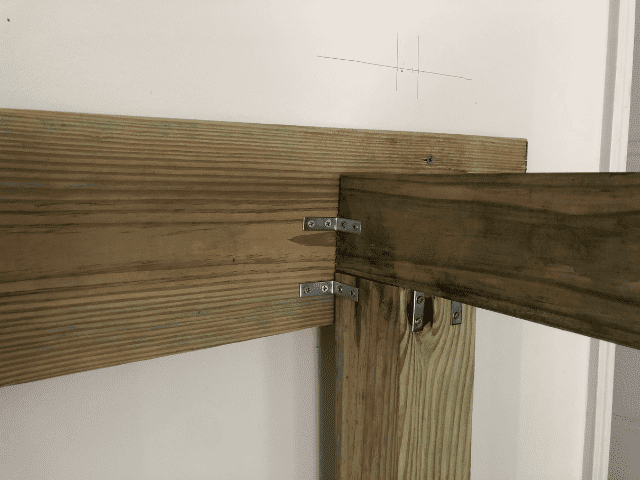
Finish by putting brackets from your horizontal beam to both the wall and the back vertical beams.
That’s it.
I’ve now been using my DIY squat rack for a few weeks and it’s doing great. I’m not asking it to do much. Simply hold a barbell up in the air between sets of Back Squats, Jerks and Presses. That’s pretty much it.
I also want to reiterate the fact that I use my squat rack just for myself. Just me. Someone who has been lifting since they were 12 years old.
I don’t have inexperienced lifters using my rack, I don’t have kids on or around my rack. Not saying that this makes my rack any safer, but I know that I’m not going to be reckless when using it.
Let me answer the question that I know I’m going to get the most.
What If I Want to Bench?
Good luck to ya. Just kidding, kind of. Personally, at this point in my lifting career I primarily Olympic Lift so I’m not worried at all about needing to bench press.
However, if you do want to use your rack to bench I would suggest buying a wall-mounted rack (or maybe a full blown power rack) from Titan or Rogue fitness.
The reason I say that is this – the idea of trusting a DIY squat rack when I’m setting down a set of squats as I’m standing upright is wayyyyyy different than setting down a set of bench press with the barbell hovering over my face.
Final Thoughts
I couldn’t be happier about my decision to make my own DIY squat rack. From a functionality standpoint, it’s been exactly what I was wanting and it has also been one of my favorite DIY projects for my home gym thus far.
It saved me a few bucks that I ended up being able to put towards a really good bar and set of plates.
To each their own though. If you are going to be doing a lot of benching, want a built-in pull-up bar or spotter’s arms then you may want to go in a different direction. But, if what you need is a simple squat rack or squat stand, then why not consider making your own.
For more DIY projects, make sure to check out my Garage Gym DIY Projects page.