
8 Best Toes to Bar Alternatives (Beginner to Advanced)
Toes to Bar are one of the most effective exercises for building a strong, powerful core. They also come with additional benefits like grip strength, shoulder stability and upper body strength.
However, sometimes you may find yourself needing an alternative for Toes to Bar.
Maybe you don’t have a pull-up bar to use or maybe you’re just not ready for Toes to Bar yet because they’re crazy hard to do.
Whatever the reason, if you’re looking for an exercise to substitute for Toes to Bar then you’re in the right place. I’m about to share with you 8 of my favorite Toes to Bar alternatives, all of which target the lower abdominal region.
Alternatives for Toes to Bar
This list goes in order from the easiest alternative to do and progresses all the way to what I believe is the most difficult exercise out of the 8.
Also of note, the first four Toes to Bar alternatives require no bar and are done on the floor with minimal or no equipment needed. The second four Toes to Bar alternatives will require you to have a pull-up bar.
Seated Knee Lifts
This is the easiest of all the Toes to Bar alternatives. If you’re a beginner, Seated Knee Lifts is the first variation I would start with. As your strength (both core and hip flexors) improves, begin progressing your way down the list.
Equipment Needed
- Bench or Plyo Box
Muscles Worked
- Abdominal Core Muscles (Rectus Femoris, Obliques Externus Abdominus)
- Quadriceps, Rectus Femoris
- Tensor Fasciae Latae (TFL)
Step-by-Step Instructions
- Sit on the edge of a bench, legs hanging off the side with hands on the bench for balance.
- Lean back slightly, straighten the legs and lift them up off the ground.
- Now pull the knees into the chest and then straight them back to the starting position.
- Continue until all reps are completed.
Coaching Points
Try to keep your feet off the ground throughout the movement until all reps are completed.
Straight Leg Lying Leg Raises
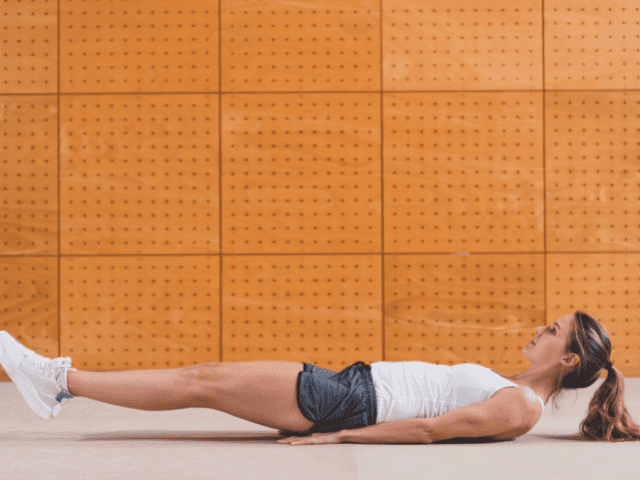
Straight Leg Leg Raises are a very similar movement as Toes to Bar. The difference is, you’re laying on your back instead of hanging from a bar. If you don’t have access to a pull-up bar, Lying Leg Raises is probably the closest direct substitution.
Equipment Needed
- None
Muscles Worked
- Abdominal Core Muscles (Rectus Femoris, Obliques Externus Abdominus)
- Quadriceps, Rectus Femoris
- Tensor Fasciae Latae (TFL)
Step-by-Step Instructions
- Lay on your back, feet together, legs straight.
- Arms can either be at your side or underneath your low back as support*.
- Start by raising the feet to six inches off the floor.
- Now, using the core, raise the feet until they are straight up (perpendicular to the floor**)
- Finally, lower the legs under control back to the starting position – feet six inches from the floor.
- Repeat for the designated number of reps.
Coaching Points
*Some will find that Straight Leg Lying Leg Raises puts an uncomfortable strain on the low back. Placing both hands under the low back will alleviate this strain for most.
**If you find yourself struggling with being able to get your legs perpendicular to the floor while keeping them straight, then I would highly suggest working on your hamstring flexibility. You should be able to achieve at least this level of range of motion. (You’ll need it to be able to do Toes to Bar later on.)
Don’t rush through the movement. The eccentric portion of the movement (lowering the legs) is just as effective at working the abs as the concentric portion.
Suitcase Crunches
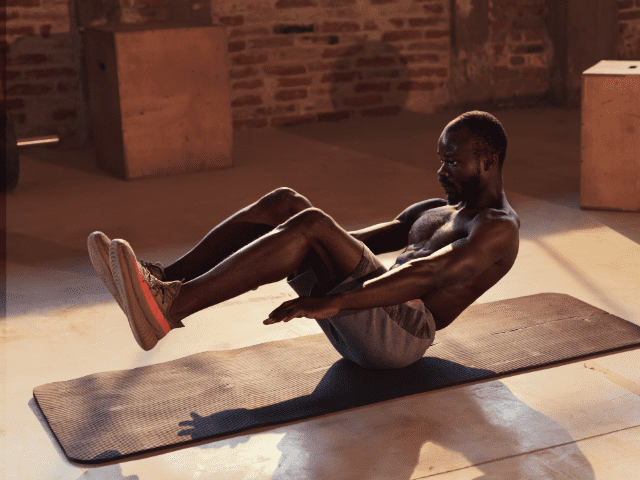
It’s debatable whether or not Suitcase Crunches are more difficult than Straight Leg Leg Raises. Suitcase Crunches does introduce having to coordinate the upper and lower body and incorporates a lot of time under tension. For these reasons, I have them in this spot in the progression.
Equipment Needed
- None
Muscles Worked
- Abdominal Core Muscles (Rectus Femoris, Obliques Externus Abdominus)
- Quadriceps, Rectus Femoris
- Tensor Fasciae Latae (TFL)
Step-by-Step Instructions
- Start by sitting on the ground, balancing on your butt with legs and back up off the ground.
- Legs should be almost straight, feet roughly six inches off the ground. Torso should be leaned back at about a 30-degree angle.
- From the starting position, crunch up, bringing the knees and chest together above the hips (like a suitcase shutting)
- Lower back to the starting position and repeat until all reps are completed. (Feet and back should stay off the ground throughout the movement)
Coaching Points
If you keep your feet uncrossed during the movement, your groin will be forced to stay engaged. This creates a small added bonus to the exercise.
Med Ball Straight Leg Leg Raises
Adding a Medicine Ball takes Straight Leg Leg Raises up a notch. This will be the last alternative for Toes to Bar that is done on the ground.
Equipment Needed
- Medicine Ball
Muscles Worked
- Abdominal Core Muscles (Rectus Femoris, Obliques Externus Abdominus)
- Quadriceps, Rectus Femoris
- Tensor Fasciae Latae (TFL)
Step-by-Step Instructions
- Lay on your back, legs straight and place a medicine ball between your feet.
- Arms can either be at your side or underneath your low back as support*.
- Start by raising the feet to six inches off the floor (should be high enough to get the ball off the floor).
- Now, using the core, raise the feet until they are straight up (perpendicular to the floor**)
- Finally, lower the legs under control back to the starting position – feet six inches from the floor. Try to keep the medicine ball from hitting the floor in between reps.
- Repeat for the designated number of reps.
Coaching Points
*Some will find that Med Ball Straight Leg Leg Raises puts an uncomfortable strain on the low back. Placing both hands under the low back will alleviate this strain for most.
**If you find yourself struggling with being able to get your legs perpendicular to the floor while keeping them straight, then I would highly suggest working on your hamstring flexibility. You should be able to achieve at least this level of range of motion.
Be aggressive on the leg lift and stay under control while lowering back toward the floor.
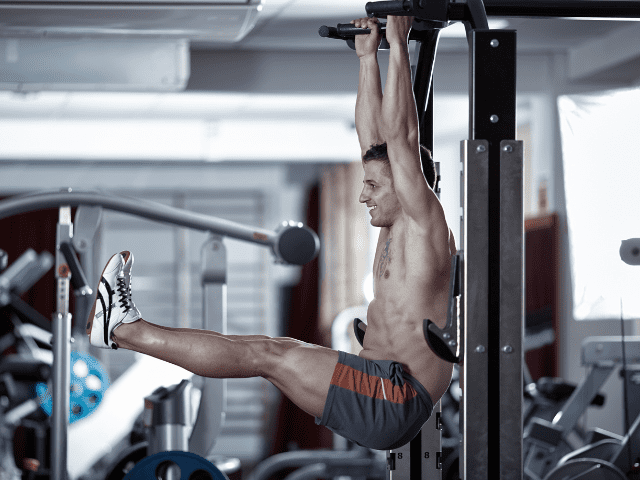
Hanging Knee Raises

The first of the hanging variations is the Hanging Knee Raise. It’s the easiest to do and from a technique standpoint, the easiest to be able to control. Once you feel ready to progress to the bar, start here first.
Understand that from here on out, each exercise will not only challenge your core but your upper body and grip strength as well.
Equipment Needed
- Pull-Up Bar – Ideally a stand-alone pull-up bar or one connected to a squat rack although any sturdy object you can hang from will technically work.
Muscles Worked
- Abdominal Core Muscles (Rectus Femoris, Obliques Externus Abdominus)
- Quadriceps, Rectus Femoris
- Tensor Fasciae Latae (TFL)
- Back and Forearms
Step-by-Step Instructions
- Find yourself a pull-up bar and grip the bar with an overhand grip
- Engage your lats so your body doesn’t go limp once you begin to hang
- Now hang from the bar and drive your knees up to hip height (or slightly above hip height)
- Finally, actively lower your legs back to the starting position – don’t allow the legs to just swing down
- Repeat for the designated number of reps
Coaching Points
The biggest issue that most of my athletes run into when doing Hanging Knee Raises is how to keep from swinging. (Something I’m going to mention for pretty much every hanging ab movement)
To keep from swinging, you have to actively lower your legs back down. If you ‘let your legs go’ and just allow gravity to take over you’ll completely lose control of the movement. Timing and rhythm are both important for Knee Raises and you can’t achieve either if you’re not in control of your legs throughout the movement.
Hanging Straight Leg Raise
Once you’ve progressed to Hanging Straight Leg Raises, you’re really close to being ready for Toes to Bar. Hamstring flexibility will come back into play here so hopefully, it’s something you worked on while doing Straight Leg Leg Raises on the ground.
Equipment Needed
- Pull-Up Bar – Ideally a stand-alone pull-up bar or one connected to a squat rack although any sturdy object you can hang from will technically work.
Muscles Worked
- Abdominal Core Muscles (Rectus Femoris, Obliques Externus Abdominus)
- Quadriceps, Rectus Femoris
- Tensor Fasciae Latae (TFL)
- Back and Forearms
Step-by-Step Instructions
- Find yourself a pull-up bar and grip the bar with an overhand grip.
- Engage your lats so your body doesn’t go limp once you begin to hang.
- Now hang from the bar and keeping your legs straight, drive them up to hip height (or slightly above hip height).
- Finally, actively lower your legs back to the starting position – don’t allow the legs to just swing down.
- Repeat until all reps are completed.
Coaching Points
The biggest issue that most of my athletes run into when doing Hanging Straight Leg Raises (or any hanging ab exercise for that matter) is how to keep from swinging out of control.
To keep from swinging, you have to actively lower your legs back down. If you ‘let your legs go’ and just allow gravity to take over you’ll completely lose control of the movement. Timing and rhythm are also both important for Leg Raises and you can’t achieve either if you’re not in control of your legs throughout the movement.
Knees to Elbows
Knees to Elbows would be the last exercise right before Toes to Bar. Knees to Elbows demands a much more active upper body compared to the first two hanging ab exercises.
Equipment Needed
- Pull-Up Bar – Ideally a stand-alone pull-up bar or one connected to a squat rack although any sturdy object you can hang from will technically work.
Muscles Worked
- Abdominal Core Muscles (Rectus Femoris, Obliques Externus Abdominus)
- Quadriceps, Rectus Femoris
- Tensor Fasciae Latae (TFL)
- Secondarily: Back, Biceps and Forearms
Step-by-Step Instructions
- Find yourself a pull-up bar and grip the bar with an overhand grip
- Engage your lats so your body doesn’t go limp once you begin to hang
- Now hang from the bar and flex your arms to about a 90-degree angle at the elbow
- Lift the knees up and slightly roll the hips forward until the knees touch the elbows
- Actively drive your legs down and straight and then repeat.
- Don’t allow your legs to ‘just fall’ after touching your knees or you’ll swing uncontrollably.
- Repeat for the designated number of reps
Coaching Points
The biggest issue that most of my athletes run into when doing Knees To Elbows is how to keep from swinging.
To keep from swinging, you have to actively lower your legs back down. If you ‘let your legs go’ and just allow gravity to take over you’ll completely lose control of the movement. Timing and rhythm are both important for Knees To Elbows and you can’t achieve either if you’re not in control of your legs throughout the movement.
Windshield Wipers
The most advanced exercise on the list is Windshield Wipers. I would actually put Windshield Wipers one step past Toes to Bar on the difficulty scale. If you’ve made it this far in the progression, congrats, you’ve built yourself a pretty strong core.
Windshield Wipers are essentially a full body workout. They will challenge your abdominal muscles, grip strength, hip flexors as well as your back and biceps.
Equipment Needed
- Pull-Up Bar – Ideally one connected to a squat rack (or a stand-alone pull-up bar) although any sturdy object you can hang from will technically work.
Muscles Worked
- Abdominal Core Muscles (Rectus Femoris, Obliques Externus Abdominus)
- Quadriceps, Rectus Femoris
- Tensor Fasciae Latae (TFL)
- Secondarily: Back, Biceps and Forearms
Step-by-Step Instructions
- Find yourself a pull-up bar and grip the bar with an overhand grip
- Engage your lats so your body doesn’t go limp once you begin to hang from the bar.
- Now hang from the bar with a slight flex at the elbow
- Keeping the legs straight, flex the core and lift the legs up until your toes touch the pull-up bar.
- From this position rotate your feet to the left about two to two and a half feet.
- Now swing them back to the top and over to the right about the same distance.
- Continue to rotate back and forth from the left to the right and back until all reps are completed (or until a break is needed to reset)
Coaching Points
As mentioned at the top of this guide, this is an extremely challenging ab exercise. I would highly suggest mastering the other hanging ab exercises like Knees to Elbows and Toes to Bar before beginning to attempt Windshield Wipers.
Because you’re almost hanging upside down while doing Windshield Wipers, the grip plays an extremely critical role. If you ever feel you’re struggling with your grip AT ALL, you should stop your set immediately.
Final Thoughts
Toes to Bar are an excellent exercise for developing a strong, powerful core but sometimes Toes to Bar just aren’t an option. You may not have the proper equipment available to you or at other times you might just be looking to add some variety to your training program.
In these situations, you’ll need a Toes to Bar alternative and I hope that at least one of the exercises I’ve listed here fits what you were looking for.