10 Dumbbell Shrug Alternatives To Hammer Your Traps
Dumbbell Shrugs are a staple in my strength training programming. Giant traps not only look awesome, but a powerful shrug can help with Olympic lifting and strengthening the neck area has been shown to help reduce the risk of concussions for athletes.
However, sometimes you may need an alternative for Dumbbell Shrugs.
Maybe you don’t have dumbbells or maybe you’re just looking to add some variety to your workouts.
Whatever the reason, if you’re looking for an exercise to substitute for Dumbbell Shrugs then you’re in the right place. I’m about to share with you 10 of my favorite Dumbbell Shrug alternatives.
Alternatives for Dumbbell Shrugs
I’ve tried to include as much variety in this list of alternatives as possible. There are exercises that utilize all kinds of different equipment – some that still use dumbbells, but also movements that use a barbell and even a cable machine.
What all these exercises have in common, though, is that they all focus on and emphasize the upper trapezius area.
Barbell Shrugs
Equipment Needed
- Barbell
- Weight Plates (either Bumper Plates or Steel Plates will work fine)
- Lifting Straps (optional)
Step-by-Step Instructions
- Set up a barbell on either J-Hooks, or preferably, on the squat rack’s safety bars (if your rack has them)
- Use an alternated grip, one hand pronated (overhand) and one hand supinated (underhand), about shoulder-width apart
- Place feet hip-width apart, brace the core and stand tall with the bar
- Now shrug up, visualizing touching your traps to your ears.
- Do NOT ‘roll’ the shoulders. Shrug straight up and down.
- Control the weight back down to the starting position and repeat.
Coaching Points
Barbell Shrugs already have a short range of motion. Don’t shorten the range of motion even further by adding more weight than you can properly lift. (A mistake I see quite often)
An alternated grip, one overhand and one underhand, will dramatically increase your grip strength on the bar. This is due to the fact that a barbell has a natural tendency to want to roll out of your hands. By alternating your grip, you are basically counterbalancing that rolling tendency.
The height you place the bar in the rack is probably more important than it gets credit for. Place it too low and it adds a partial deadlift to the exercise but place it too high and you’ll hit the bar off the rack while doing reps.
Snatch Grip Shrugs
Equipment Needed
- Barbell
- Weight Plates (either Bumper Plates or Steel Plates will work fine)
- Lifting Straps (optional)
Step-by-Step Instructions
- Set up a barbell on either J-Hooks, or preferably, on the squat rack’s safety bars (if your rack has them)
- Use an overhead grip, with hands wide – outside the snatch rings
- Place feet hip-width apart, brace the core and stand tall with the bar
- Now shrug up, visualizing touching your traps to your ears.
- Do NOT ‘roll’ the shoulders. Shrug straight up and down.
- Control the weight back down to the starting position and repeat.
Coaching Points
When doing Snatch Grip Shrugs, be mindful of your hands when taking the bar in and out of the rack (or wherever you are placing the bar between sets.). A wide grip can often make your hands dangerously close to J-Hooks and Safety Bars.
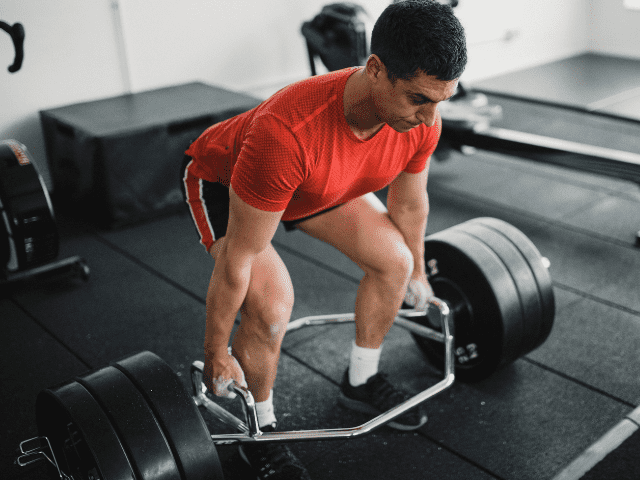
Trap Bar Shrug
Equipment Needed
- Trap Bar (or Hex Bar as they’re also known)
- Weight Plates (either Bumper Plates or Steel Plates will work fine)
Step-by-Step Instructions
- Place feet hip-width apart, brace the core and stand tall with the bar
- Now shrug up, visualizing touching your traps to your ears.
- Do NOT ‘roll’ the shoulders. Shrug straight up and down.
- Control the weight back down to the starting position and repeat.
Coaching Points
Elevating a trap bar up onto lifting blocks, or on the rack if your trap bar is capable, will make Trap Bar Shrugs much easier to get set up for. Otherwise, you’ll need to pick the bar up off the floor for each set which can start to be a challenge with heavier weight.
PRO TIP: Hex Bars can vary a good bit in weight, keep this in mind if you’re loading a hex bar that you don’t normally work with.
Cable Upright Row
Equipment Needed
- Cable Machine
Step-by-Step Instructions
- Attach a straight handle* to a cable machine and lower the attachment pin to the bottom of the beam.
- Grab the handle with an overhand grip and stand tall, handle starting right in front of the thighs.
- Flex your knees slightly and stand upright with good posture.
- Pull the cable handle upward along the abdomen and chest toward the chin.
- At the top, the elbow should be higher than the wrist, and above the shoulders.
- Lower the handle under control back to the front of the thighs.
- Do not ‘jerk’ or ‘rock’ the weight up and keep the handle close to the torso throughout.
Coaching Points
*You can use multiple different attachments other than a straight handle. The Rope Attachment is another popular attachment for Cable Upright Rows.
Barbell Upright Row
Equipment Needed
- Barbell
- Bumper Plates (or Iron Plates if not dropping the bar after sets)
Step-by-Step Instructions
- Grasp bar about shoulder-width apart.
- Hold the barbell with palms down.
- Start with the bar at arm’s length.
- Flex your knees slightly.
- Pull the bar upward along the abdomen and chest toward the chin.
- At the top, the elbow should be higher than the wrist, and above the shoulders.
- Lower the bar slowly and under control to the front of the thighs.
- Do not jerk.
- Keep the bar close to the torso.
Coaching Points
The biggest mistake I see, by far, with Barbell Upright Rows is swinging way too much to lift the bar. A little swing is okay if you’re trying to grind out the last rep or two of a set.
However, if you’re having to rock your torso for every rep then the weight is too heavy. Take some weight off the bar and use proper form.
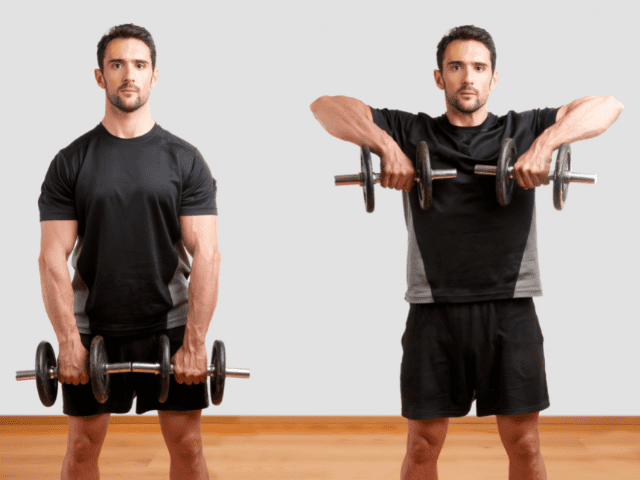
Dumbbell Upright Rows
Equipment Needed
- Dumbbells
Step-by-Step Instructions
- Grab two dumbbells and start with them at arm’s length in front of the thighs, palms toward the body.
- Flex your knees slightly and stand upright with good posture.
- Pull the dumbbells upward along the abdomen and chest toward the chin.
- At the top, the elbow should be higher than the wrist, and above the shoulders.
- Lower the bar dumbbells and under control to the front of the thighs.
- Do not ‘jerk’ or ‘rock’ the weight up and keep the dumbbells close to the torso throughout.
Coaching Points
The biggest mistake I see, by far, with Dumbbell Upright Rows is swinging way too much to lift the weight.
Hang Muscle Snatch

Equipment Needed
- Barbell
- Bumper Plates
Instructions
- Using a snatch grip (hands outside the snatch rings), pick up the bar and stand tall.
- Pull the shoulder blades back and engage the lats to lock the back in place.
- Put a slight bend in the knee and hinge forward by pushing the hips back and letting the bar slide down the thigh.
- Stop once the bar reaches the bottom of the thigh, just above the knee. Shoulders should be above or slightly in front of the bar.
- Now, explosively extend the hips and pull the bar high once the triple extension of the hips, knees and ankles has been achieved.
- Finish the movement by rotating the hands above the elbow.
- The finishing position should be with the lifter fully extended. This is much different than most other variations of the snatch where the lifter catches in a full or quarter squat.
Coaching Points
Once the weight gets heavy enough, the natural adjustment of the lifter will be to want to bend the legs to dip slightly under the bar in order to get full arm extension. Resist this urge to want to dip the legs. If doing a Hang Muscle Snatch isn’t possible without bending the knees then lower the weight.
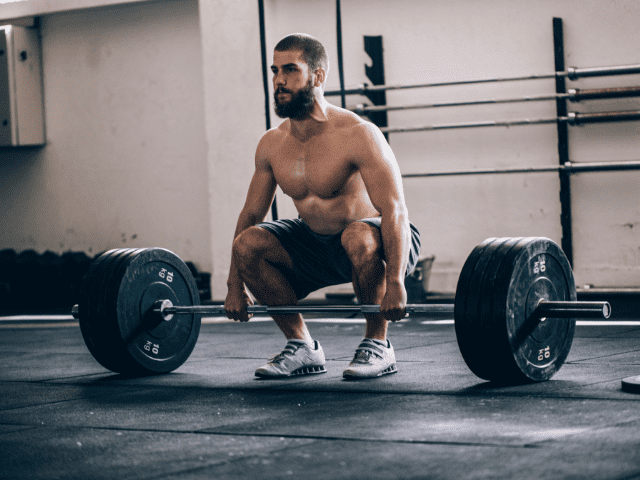
Clean Pulls
Equipment Needed
- Barbell
- Bumper Plates
Step-by-Step Instructions
Starting Stance
- Start with feet hip-width apart with toes straight ahead (or ever so slightly pointed out).
- The bar should be over the middle of the feet. I always used the knot in your shoelace as a visual cue, but essentially the bar is close to (but not touching) the shins.
- Grip should be slightly wider than shoulder width.*
- The grip is a pronated grip (both palms facing down) and the lifter can choose, although highly recommended, to use a hook grip.
- The wrists should be slightly curled so that the knuckles are pointed straight down to the ground.
- Shoulders slightly over the bar, arms straight, hips slightly higher than the knees.
- Back should be flat or have a slight arch. Shoulder blades should be pulled back and the upper back including the lats should be engaged.
First Pull
The ‘First Pull’ simply refers to the portion of the movement that involves moving the bar from the floor to the knee.
- The last thing that should happen as the lifter is setting up in their starting stance is to take a deep breath in and engage, or brace, their core.
- Raise the bar off the floor at a constant speed using the legs by driving the feet through the ground. Arms should stay straight and the barbell shouldn’t be ‘yanked’ off the ground.
- Hips and shoulders rise at the same time (torso angle remains constant)**.
- As the bar comes up, keep the bar close to the shins and the feet should remain flat, driving the feet hard into the floor.
- Finally, as the bar passes knee level, wrists remain curled and elbows rotate out to the side, core and back should still be tight and engaged.
Second Pull (and finish)
The second pull involves getting the bar from just above the knee to the power position. The power position is the point where the athlete is nearly vertical and where the final triple extension of the hip, knees and ankles will occur followed immediately by the shrug and pull from the arms.
- Once the bar crosses the knees, the bar is then pulled explosively, bringing the shoulders back and up.
- As the lifter continues to drive vertically, the shoulders will end up slightly behind the bar and the hips, knees slightly bent and ankles will have just a bit of flexion left in them.
- From the power position, this is where the final explosive hip extension occurs along with the full extension of the knees.
- The foot drive shifts from the whole foot to now extending up through the balls of the feet.
- The triple extension of the hip, knees and ankles is followed instantaneously by a quick, aggressive shrug.
- Bar is pulled vertically close to the body as the traps shrug to elevate the bar.
- Now, either retrace back to the floor or drop the bar and then reset.
Coaching Points
*An easy way to get your grip in the right position is to place your hands one thumb length away from the start of the knurling of the bar. This width will work for 90% of lifters. Wider athletes may end up sliding their hands just a bit wider and vice versa for narrow athletes, but it’s a good starting point for anyone.
**One of the biggest mistakes with Clean Pull technique is that lifters will shoot their butt up first, locking their knees out and then they end up pulling the bar with their back instead of their legs. This is most often caused by lifters trying to rush the first pull too much. Don’t get ahead of yourself.
Dumbbell Side Raise
Equipment Needed
- Dumbbells
Instructions
- Hold dumbbells-palm in, arms straight down at sides.
- Raise dumbbells in semicircular motion slightly above shoulder height tilting the head of the dumbbell down.
- A slight pause, then lower to starting position under control.
- Keep your arms straight with just a slight bend in the elbow.
- Use the same path to continue repeated reps.
- Exhale up, inhale down.
Coaching Points
When doing Side Raises, to keep the focus on the medial delt, make sure to keep your palms down at the top of the movement. Many lifters like to pull back, instead of lift straight out to the sides, which brings the stronger muscles of the upper back into play.
Farmer’s Walk
Equipment Needed
- 1 kettlebell or dumbbell if doing single arm carries
- 2 kettlebells or dumbbells if doing both arms
- A trap bar is also an awesome implement for farmer’s walks
FYI: There are also very-specific pieces of equipment (shown above) designed almost solely for Farmer’s Walks. If you ever find yourself in a Strongman Gym, you may run into some of these. They can be a blast to train with.
Step-By-Step Instructions
- For the sake of these instructions, I am going to assume you are carrying 2 kettlebells or dumbbells. The trap bar and single-arm variations are essentially the same movements with slightly different benefits.
- With the kettlebells at your side, hinge at the waist and bend at the knee until you can pick them up. Remember to always lift with a nice flat back, neutral spine, and a tight core.
- Hold the kettlebells slightly away from your sides.
- Keep the core tight, shoulder blades back, and posture up tall.
- Walk with extreme control. Generally, I prescribe walking 20 yards out and 20 yards back for a set but longer distances are fine as long as the form remains intact.
- Focus on crushing the handles with your grip. Avoid any trunk deviation side to side or front to back. Try to walk as controlled as you possibly can.
Coaching Points
Choosing an appropriate weight is critical here. The focus is to keep the core tight and maintain perfect posture. So if you go too heavy and your form deteriorates, you won’t get the full benefit of the exercise and may hurt yourself.
Need a Training Program?
Coach Horton has 20 years of experience training elite level athletes at schools like the University of Tennessee and Georgia Tech. He has also written plenty of programs for other coaches and friends and family.
So, whether you need a program to improve your performance in your sport or you just want to look good at the beach, there is a program designed just for you.
Final Thoughts
Dumbbell Shrugs are an excellent exercise for upper trap development, but sometimes they’re just not an option. You may not have dumbbells available to you or at other times you might just be looking to add some variety to your shoulder routine.
In these situations, you’ll need a Dumbbell Shrug alternative and I hope that one of the exercises I’ve listed here fits what you were looking for.