
10 Best Battle Rope Alternative Exercises (No Rope Needed!)
Battle Ropes are one of the most effective tools for building a strong core, powerful arms and shoulders and they’re also great for upper body conditioning. They’re also very beginner-friendly and can fit perfectly into a circuit.
However, sometimes you may find yourself needing a Battle Rope alternative. The most obvious of which is… you don’t have Battle Ropes.
Admittedly it’s difficult to replace everything Battle Ropes can do with just one exercise. But, don’t worry, that’s why I’m giving you 10. Some of these exercises are great dynamic core movements, some will tax the shoulders and others will get your heart rate up.
So, you can treat this list like a buffet: Grab the battle rope alternatives that you like and thumb your nose at the ones you don’t.
Alternatives for Battle Ropes
Medicine Ball Slams

Med Ball Slams are probably the closest exercise that can provide all the benefits of Battle Ropes. They’re a dynamic exercise that works the core, and upper body and can get your blood pumping.
If you don’t have battle ropes but you have a medicine ball, a Medicine Ball Slam would be my first suggestion as a substitution.
Bonus Exercise: Medicine Ball Side Slams are a slight variation to regular slams that get the obliques more involved. I would suggest throwing those in the mix as well.
Step-by-Step Instructions
- Grab a medicine ball and stand tall with feet roughly shoulder-width apart.
- Reach the medicine ball high overhead.
- Using the core, pull the body down – hinging forward at the hips.
- Follow through with the arms and release the ball.
- Let the ball slam into the ground, catch it off the bounce and repeat.
Coaching Points
The biggest mistake I see with Medicine Ball Slams is athletes not utilizing the core and simply throwing the ball down with their arms. The bulk of the force should be generated by aggressively using the core to hinge forward. If done correctly, it should almost (and actually might) lift your feet up off the floor.
Sledgehammer Slams
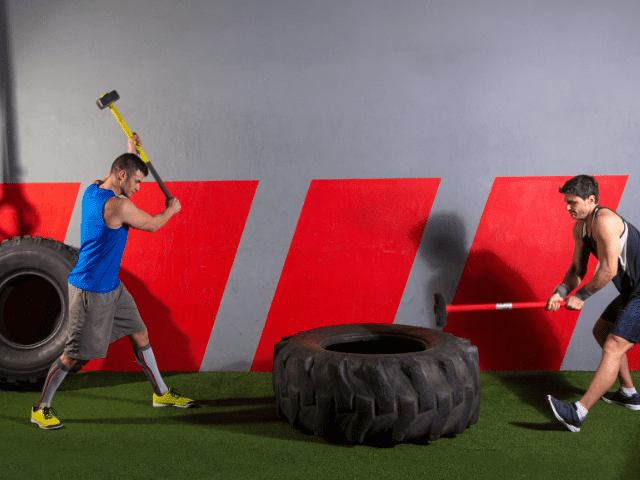
Sledgehammer Slams may look a lot different than Battle Rope exercises, but the major muscles used and the overall movement pattern is actually very similar. If you have access to a Sledgehammer and a Tractor Tire, they can work as an excellent alternative for a Battle Rope.
Step-by-Step Instruction
- Hold the sledgehammer with one hand on the end of the handle and the other hand about 3/4 of the way toward the head of the hammer.
- Take a strong athletic stance. Slight bend in the knee and hips back.
- Always remember to engage the core.
- Pull the hammer up and rotate the hammer until it is slightly overhead.
- Your arms should still be slightly bent.
- Forcefully bring the hammer down to slam
- As the hammer approaches the tire, you should feel your top hand slide and they will be together at impact.
Coaching Points
Focus on force production. Slam the tire as hard as you can.
Remember to engage the core. As you bring the hammer down, really pull down with those lats and abs to get the best strike possible.
Need a Training Program?
Visit the Horton Barbell Shop and Use Code “HB10” for 10% Off ANY Program!
Kettlebell Swings

If you have kettlebells, Kettlebell Swings are another movement that closely resembles Battle Rope exercises. The core, posterior chain and arms are all involved in this exercise that works the entire body.
Kettlebell Swings are also relatively easy to learn and can fit well into a metabolic circuit.
Pro Tip: If you don’t have a kettlebell, you can also do Kettlebell Swings by grabbing the head of a dumbbell.
Equipment Needed
- Kettlebell (you can also use a dumbbell by grabbing the end of it)
Step-by-Step Instruction
- Starting Position: Stand with feet shoulder-width apart, holding the kettlebell with both hands in front of you.
- Hinge: Push your hips back, bending slightly at the knees, and lowering the kettlebell between your legs.
- Explosive Swing: Powerfully extend your hips and knees, swinging the kettlebell forward and upward to chest height.
- Top Position: At the peak, your body should be in a straight line from head to heels.
- Descend: Allow the kettlebell to swing back down, hinging at the hips, and preparing for the next repetition.
Coaching Points
Kettlebell Swings are a great movement to train rapid hip extension and flexion. Remember to always keep a neutral spine.
Choosing the proper kettlebell weight is important. Heavier is not always better. Because of the rapid nature of Kettlebell Swings, the emphasis should be on velocity, speed, and power.
Single Arm Dumbbell Snatch

Single Arm Snatches are a very close cousin of Kettlebell Swings and therefore also a good Battle Rope alternative.
Single Arm Snatches may not be able to be done at as high of a tempo, but they are an explosive hip movement that hits the posterior chain, core and shoulders.
Step-by-Step Instructions
- Starting Position: Stand with feet shoulder-width apart, holding the dumbbell in one hand, positioned between your legs.
- Hip Hinge: Begin with a slight bend in the knees and hinge at the hips, lowering the dumbbell towards the ground.
- Explosive Pull: Powerfully extend your hips and knees, pulling the dumbbell upwards in a straight line.
- Transition: As the dumbbell ascends, begin to pull your elbow underneath it.
- Catch: Fully extend your arm overhead, catching the dumbbell in a locked-out position.
- Lower: Control the dumbbell back to the starting position, maintaining good posture.
Coaching Points
The dumbbell should travel close to the body all the up until it gets about head height, then rotate the elbow, drop the hips and catch. Don’t allow it to swing forward out away from the body.
The second technique flaw is not staying braced through the return of the dumbbell to the starting position, oftentimes from being in too big of a hurry to knock out reps. Letting the dumbbell, especially the heavier you get, yank the shoulder down at the bottom of the rep is asking for trouble.
Medicine Ball Situp and Throw

One of my favorite med ball exercises is the Medicine Ball Situp and Throw. It mimics the Medicine Ball Slam (the top alternative exercise listed above) almost exactly. The only differences are the starting position and the direction the ball is thrown.
Step-by-Step Instructions
- Find a partner (or wall) and sit down an appropriate distance away.
- Lay on your back holding the medicine ball overhead on the ground.
- Brace the core, engage the lats, aggressively begin to raise off the ground and throw the ball as hard as possible for distance.
- The follow-through of the throw should bring you to a full situp position.
- Allow your partner to throw the ball back (or retrieve the ball coming back from the wall) and repeat.
Coaching Points
I cue athletes to just concentrate on the throw. If they throw the ball hard enough the situp will happen naturally.
Med Ball Cannonballs

I’ve given you multiple med ball exercises as an alternative for battle ropes and there is a reason for this. Battle Ropes are extremely dynamic, powerful movements – much different than your typical stagnate presses or curls.
Medicine balls also allow for the same type of dynamic movements and there is a greater chance you have access to a med ball versus battle ropes.
Med Ball Cannonballs are a pretty simple concept. Get in a good starting position, brace your core and throw the ball as high as possible.
How To
- First, make sure you have enough ceiling height to be able to do Cannonballs. I recommend doing them outside to avoid this issue altogether.
- Grab the ball with both hands cradling under the ball. Stand tall, feet shoulder-width apart.
- Pull the shoulder blades back, engage the lats and core, slightly bend the knees and hinge forward at the hips.
- Allow the medicine ball to fall in between the shins.
- You should now be in a good athletic position that looks very similar to the starting position of a Hang Clean.
- From here, explosively drive the feet through the ground and aggressively extend the hips and throw the ball as high as possible*.
- Allow the ball to hit the ground, grab it, then reset and repeat.
Coaching Points
Do NOT try to catch the ball directly out of the air. This is a great way to jam a wrist or a finger. Allow the ball to hit the ground first before grabbing it for the next rep.
*Cannonball Throws can either be done straight up in the air or behind you to a partner. If working with a partner, stand facing away from them and throw the ball at about a 45-degree angle. The goal is to throw the ball as far as possible in the air.
Tire Flip

Not all tires are built the same. A giant, heavy tire may not be the best Battle Rope alternative.
However, if you have a tire that is challenging, but light enough to be flipped rather quickly then you might be in the sweet spot needed for this substitution.
You need to be able to flip rather quickly to get a similar cardiovascular effect to Battle Ropes and if you have a tire that’s the right size then Tire Flips can be a great alternative.
How To
- Starting Position: Stand facing the tire, feet shoulder-width apart.
- Grip: Squat down and grip the tire with your fingers under the edge, arms fully extended.
- Brace Core: Take a deep breath, tighten your core, and keep your back flat.
- Initial Lift: Drive through your heels and extend your hips and knees, lifting the tire off the ground.
- Mid-Flip: As the tire reaches knee height, reposition your hands and push it forward.
- End Position: Extend your arms and hips fully to complete the flip.
Coaching Points
Proper form is critical here. Just like with Deadlifts and Power Clean, it’s extremely important to drop the hips, use the legs and keep the back flat.
Once fatigue starts to set in I generally see athletes resort to using more back than legs. If form reaches this point then it’s time to stop flipping the tire.
Seated Med Ball Twist

Another good exercise that can be used as an alternative for Battle Ropes is the Seated Medicine Ball Twist. It’s not quite as dynamic as some of the top alternate exercises but it does work the core and upper body.
Step-by-Step Instructions
- Start by grabbing a medicine ball and taking a seat on the floor.
- Slightly bend the knees and raise your feet roughly six inches off the floor.
- Start by rotating your torso to the left and lightly tapping the med ball against the ground.
- Now turn your shoulders and rotate your torso to the right and, again, lightly tap the ball against the ground.
- Keep legs mostly still and maintain the feet off the floor throughout the movement.
Coaching Points (Common Mistakes)
The biggest mistake I see with my athletes when doing Seated Med Ball Twists is moving the ball back and forth primarily with their arms instead of rotating through the core. The focus should be on the rotation. The ball touching the ground is simply an added bonus to the movement.
Speaking of the ball touching the ground – there is no need to bang the ball off the ground as hard as possible each rep. Stay in control of the movement and the med ball and lightly tap it on the ground.
Ab Wheel
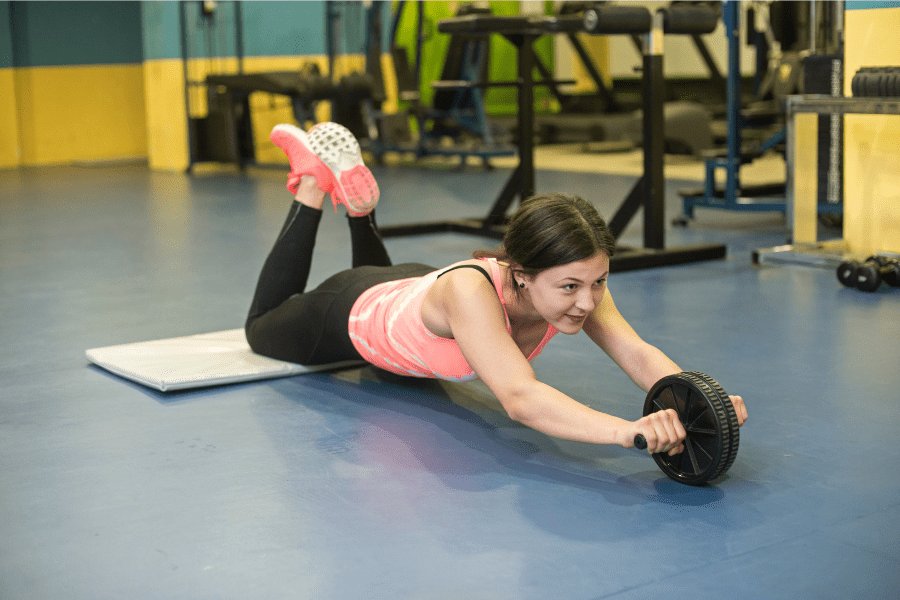
The Ab Wheel uses a similar movement pattern as battle ropes. It’s not quite as dynamic but it’s still much more so than just lying down and doing crunches.
If you don’t have an Ab Wheel you can also use a barbell with bumper plates on each side.
Step-by-Step Instructions
- Start on your knees with hands on the ab wheel handles.
- Brace the core and begin pushing the wheel forward along the ground.
- Keep rolling out, extending the body until it feels like you’re going to lose tension and fall.
- Stop just short of losing your tension and pull the wheel back towards you.
Coaching Points
Make sure to keep the core braced so the strain doesn’t end up in the low back. As your core becomes stronger you’ll be able to extend out further with the wheel.
Knees to Elbows
Knees to Elbows are a dynamic hanging ab movement. Not only will they help build a powerful core, but they’ll also work the upper body – namely the back, biceps and forearms – as well.
An exercise that works the entire body and can elevate the heart rate – sounds like a good Battle Rope alternative to me.
Step-by-Step Instructions
- Find yourself a pull-up bar and grip the bar with an overhand grip
- Engage your lats so your body doesn’t go limp once you begin to hang
- Now hang from the bar and flex your arms to about a 90-degree angle at the elbow
- Lift the knees up and slightly roll the hips forward until the knees touch the elbows
- Actively drive your legs down and straight and then repeat.
- Don’t allow your legs to ‘just fall’ after touching your knees or you’ll swing uncontrollably.
Coaching Points
The biggest issue that most of my athletes run into when doing Knees To Elbows is how to keep from swinging.
To keep from swinging, you have to actively lower your legs back down. If you ‘let your legs go’ and just allow gravity to take over you’ll completely lose control of the movement. Timing and rhythm are both important for Knees To Elbows and you can’t achieve either if you’re not in control of your legs.
Online Strength Programs
- 1-on-1 Online Coaching
- Sports Performance Programs for Football, Basketball, Soccer & More
- Programs for Former Athletes (Legends) Who Still Want to Train Like Athletes
- Programs for Adults Who Want to Get Healthy (and look great at the beach!)
- Use Code “HB10” to Get 10% Off Today
Final Thoughts
Battle Ropes are an excellent tool for developing a strong, powerful core but sometimes they’re just not an option. You may not have Battle Ropes available to you or at other times you might just be looking to add some variety to your training program.
In these situations, you’ll need some Battle Rope alternatives and I hope that at least one of the exercises I’ve listed here fits what you were looking for.
Related Posts
My Favorite Alternatives for Face Pulls
The Best Straight Arm Pulldown Alternatives (that don’t require a cable machine!)